ServiceNow
ServiceNow is a cloud-based workflow automation platform. It enables users to optimize workflows by automating repetitive tasks across platforms.
Integrating FireHydrant with ServiceNow enables you to create and manage incidents using best practices from FireHydrant while keeping ServiceNow as a source of all your teams’ work.
Available Features
- Automatically create and link ServiceNow incident records when FireHydrant incidents are created (via Create a ServiceNow Incident runbook step)
- Automatically create and link a FireHydrant incident when a ServiceNow incident record is created (via ServiceNow Business Rules)
- Automatically create and link a ServiceNow ticket when FireHydrant Follow-Ups are created
- Automatically post FireHydrant incident updates as ServiceNow Work Notes on the incident record (via Create a ServiceNow Work Note runbook step)
- Custom status and field mapping between FireHydrant and ServiceNow
- Automatically synchronize services between FireHydrant and ServiceNow
Prerequisites
- You'll need Owner permissions on FireHydrant
- You need administrative permissions in ServiceNow. This can be any admin account, but the user configuring ServiceNow with FireHydrant must have permissions to:
- Create and manage OAuth applications
- Create and manage User accounts
- You'll also need to create a generic service account in SNOW.
- This account needs the following API access:
- Table API access
- CMDB Instance API access
- Permissions to create and update records in your incident tables
- We recommend using
web_service_admin,rest_api_explorer, anditilroles as a starting point.
- This account needs the following API access:
Note: Use a generic ServiceNow service accountFireHydrant recommends using a generic ServiceNow service account rather than an individual named user to avoid problems if the named employee were to depart the organization.
Installing the ServiceNow integration in FireHydrant
OAuth Application Setup:
ServiceNow connection setup
- Log into ServiceNow with your admin account
- Navigate to System OAuth → Application Registry
- Click 'New' and select 'Create an OAuth API endpoint for external clients'
- Configure the OAuth application:
- Name: FireHydrant Integration
- Grant Type: Resource Owner Password Credentials
- OAuth Application User: Look up and select the generic service account configured in the Prerequisites section.
- Redirect URL:
https://app.firehydrant.io/auth/service_now/callback
- Click 'Submit' and save the generated Client ID and Client Secret
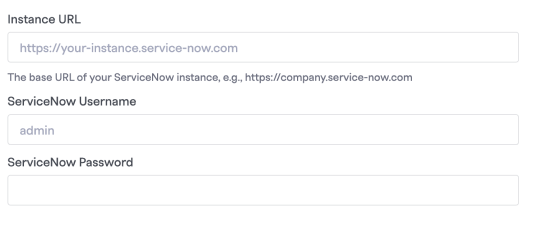
- Go to the FireHydrant Integrations page (Settings > Integrations list) and search for ServiceNow. Click the '+'.
- Enter your Instance URL, ServiceNow Username/Password, Client Id, and Client Secret on this page and click Continue to Table Selection.
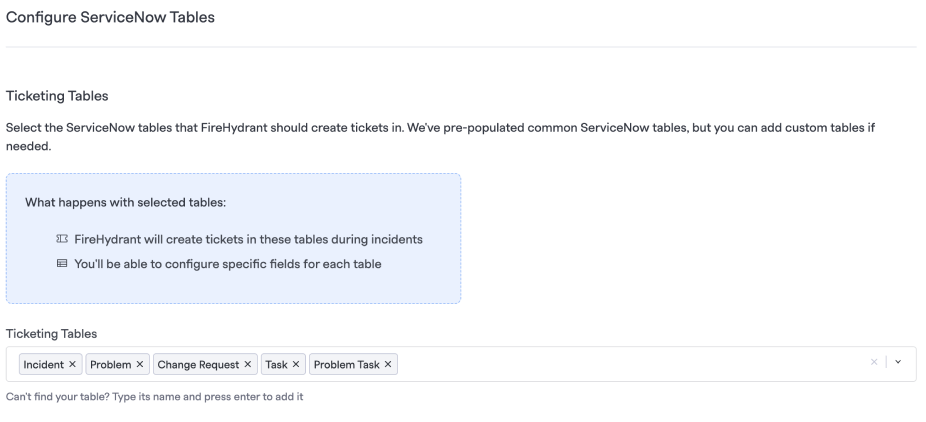
Configure ServiceNow Tables
Ticketing Tables
ServiceNow table configuration
- Select the ServiceNow tables that FireHydrant should create tickets in. We've pre-populated common ServiceNow tables, but you can add custom tables if needed.
- Type a table name and press enter to add it as a Ticketing table.
Services Tables (Optional)
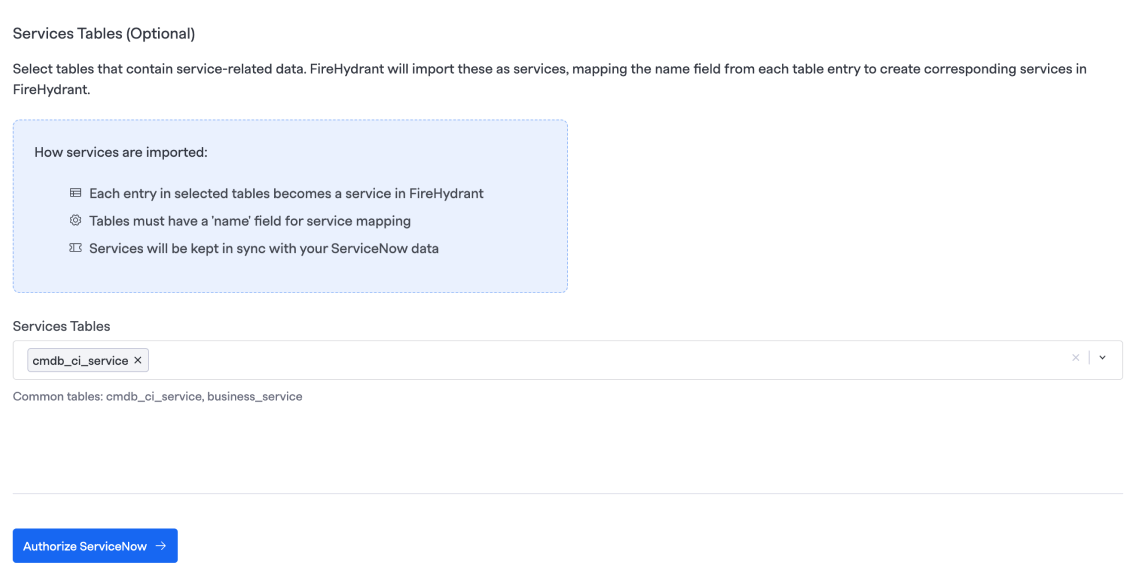
Example CMDB service table to include
- Select tables that contain service-related data. FireHydrant will import these as services, mapping the name field from each table entry to create corresponding services in FireHydrant.
- Type a table name and press enter to add it as a Service table.
Note:You must add the CMDB service table now at setup if you want to incorporate your CMDB services. FireHydrant currently doesn't supporting updating which tables sync to FireHydrant at a later date.
Authorize ServiceNow
- After you have configured ServiceNow tables click Authorize ServiceNow
Ticketing Project

ServiceNow ticketing project
Before using the ServiceNow integration with incidents and follow ups, you will need to configure a mapping for each ServiceNow project you would like FireHydrant to interact with so we know what types of issue states to use when creating ServiceNow tickets. To start, select a project to integrate with.
- Select Ticketing Project from the dropdown menu and click Use this Project
- Click Continue to begin setting up issue types and statuses for incident tickets and follow ups.
Incident Tickets
These settings will be necessary to create incident tickets in ServiceNow but can be ignored if you only plan to use this project for Follow-Ups.
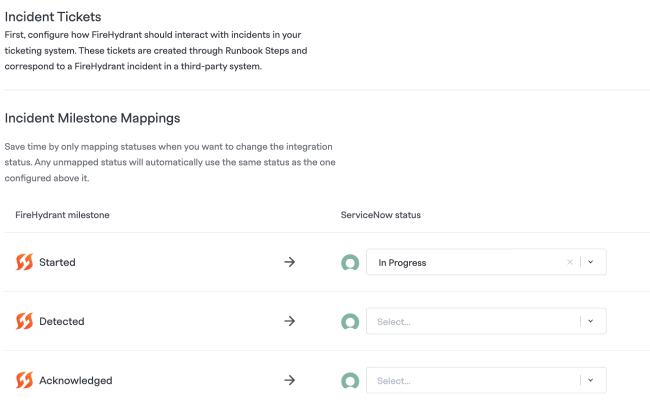
- Milestone Mappings - These are the ServiceNow ticket statuses we'll use in ServiceNow to correspond to the FireHydrant incident's Milestone.
- Any Active incident in FireHydrant corresponds to milestones in the "Active" Lifecycle phase. The default milestones are: Started, Detected, Acknowledged, Investigating, Identified, and Mitigated.
- Any Inactive incident in FireHydrant corresponds to the "Post-Incident" Lifecyle phase. The default milestones are: Resolved, Retrospective Started, and Retrospective Completed.
Follow Ups
These settings will be necessary for creating Follow-Ups in this ServiceNow but can be ignored if you only plan to use this project for incident tickets.
For example, many FireHydrant organizations will have a specific "Incidents" project where FireHydrant creates incident tickets. Then they may configure separate projects for different engineering teams to create Follow-Ups.
The available field:
- Follow-up status mappings - Maps the FireHydrant Follow-Up status to selected ServiceNow issue statuses. FireHydrant's terminology uses "Open," "In Progress," and "Done" to refer to a ticket's overall state.
Testing
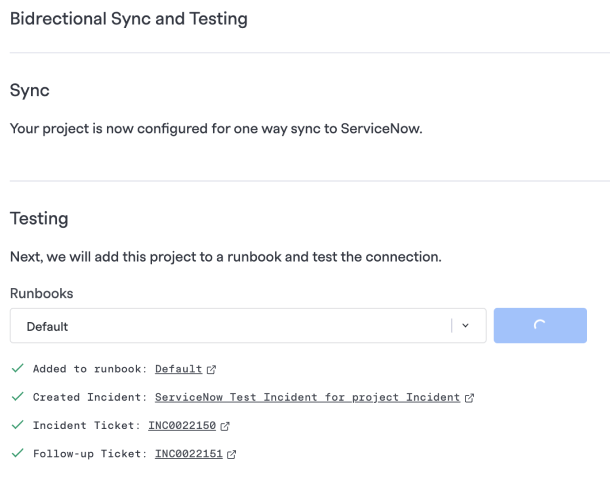
Testing the ServiceNow integration
Your project is now configured for one way sync to ServiceNow. Next, we will add this project to a runbook and test the connection.
- Select a runbook from the dropdown or choose New runbook to create a new runbook to test. Click Add and test
- A new incident with
GAMEDAYseverity, will be created it will have the runbook selected attached with both a ServiceNow incident and follow-up ticket
- A new incident with
Setting ServiceNow as the default ticketing project
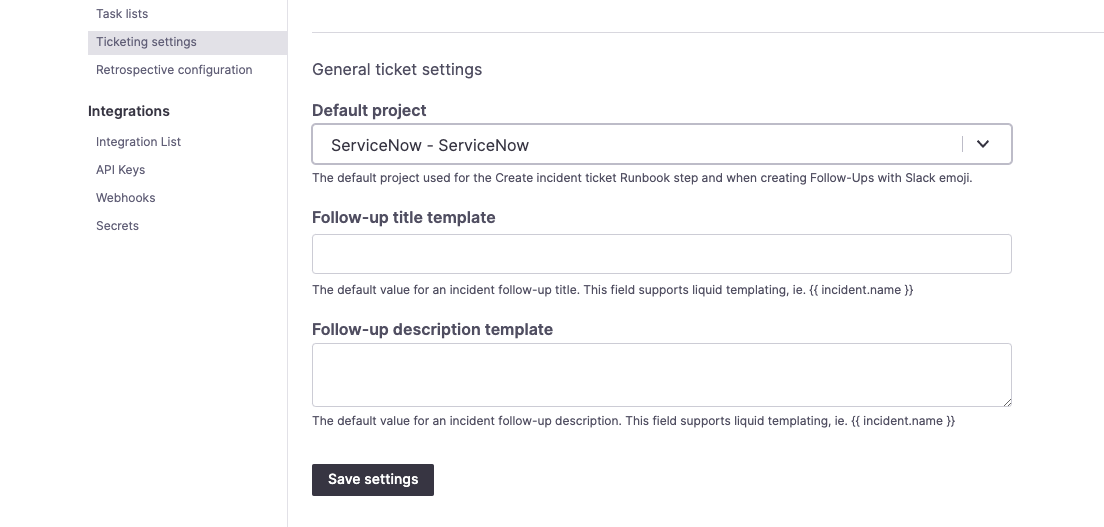
Selecting ServiceNow as the default project
- Go to Settings> Ticketing settings.
- Under Default project, select the ServiceNow project you just configured.
- Click Save settings.
Creating a ServiceNow incident from a Runbook step
You can create a ServiceNow incident from the Create a ServiceNow Incident step. This allows you to create an incident record in ServiceNow automatically any time you create an incident in FireHydrant.
Next Steps
- Learn about ServiceNow Field Mapping and how to map FireHydrant values and Jira issue fields
- Set up a ServiceNow Business Rule
- View the ServiceNow Business Rule Recipe
- Browse the rest of our integrations
- Look at the full library of available Runbook steps