Datadog
Datadog provides observability monitoring for your cloud infrastructure. Use alerts from Datadog to power incidents and notifications in FireHydrant.
Datadog and SignalsIf you're looking to connect Datadog to FireHydrant to create alerts in Signals, checkout the Signals Integration guide for Datadog. This document describes Alert Routing, which does not connect to the Signals alerting system in FireHydrant.
Prerequisites
- You will need Owner permissions to configure integrations on FireHydrant
- You will need admin access privileges or at least the ability to configure API keys and Application keys in Datadog
Configuration steps
-
First, authorize the Datadog integration on FireHydrant's integrations page.
-
You'll see a webhook URL provided once you click Authorize Application.
-
In your Datadog account, head to the Integrations page from the navigation sidebar. Search for the Webhooks integration and install/configure it, or if already installed, click Configure to open its configuration form in a modal.
-
Click the + New button to add a new webhook. Input a unique name, and paste the URL given to you in FireHydrant. For the Payload, use the following:
{
  "event": {
    "id": "$ALERT_CYCLE_KEY",
    "title": "$EVENT_TITLE",
    "description": "$EVENT_MSG",
    "priority": "$ALERT_PRIORITY",
    "status": "$ALERT_TRANSITION",
    "date": "$DATE",
    "url": "$LINK"
  }
}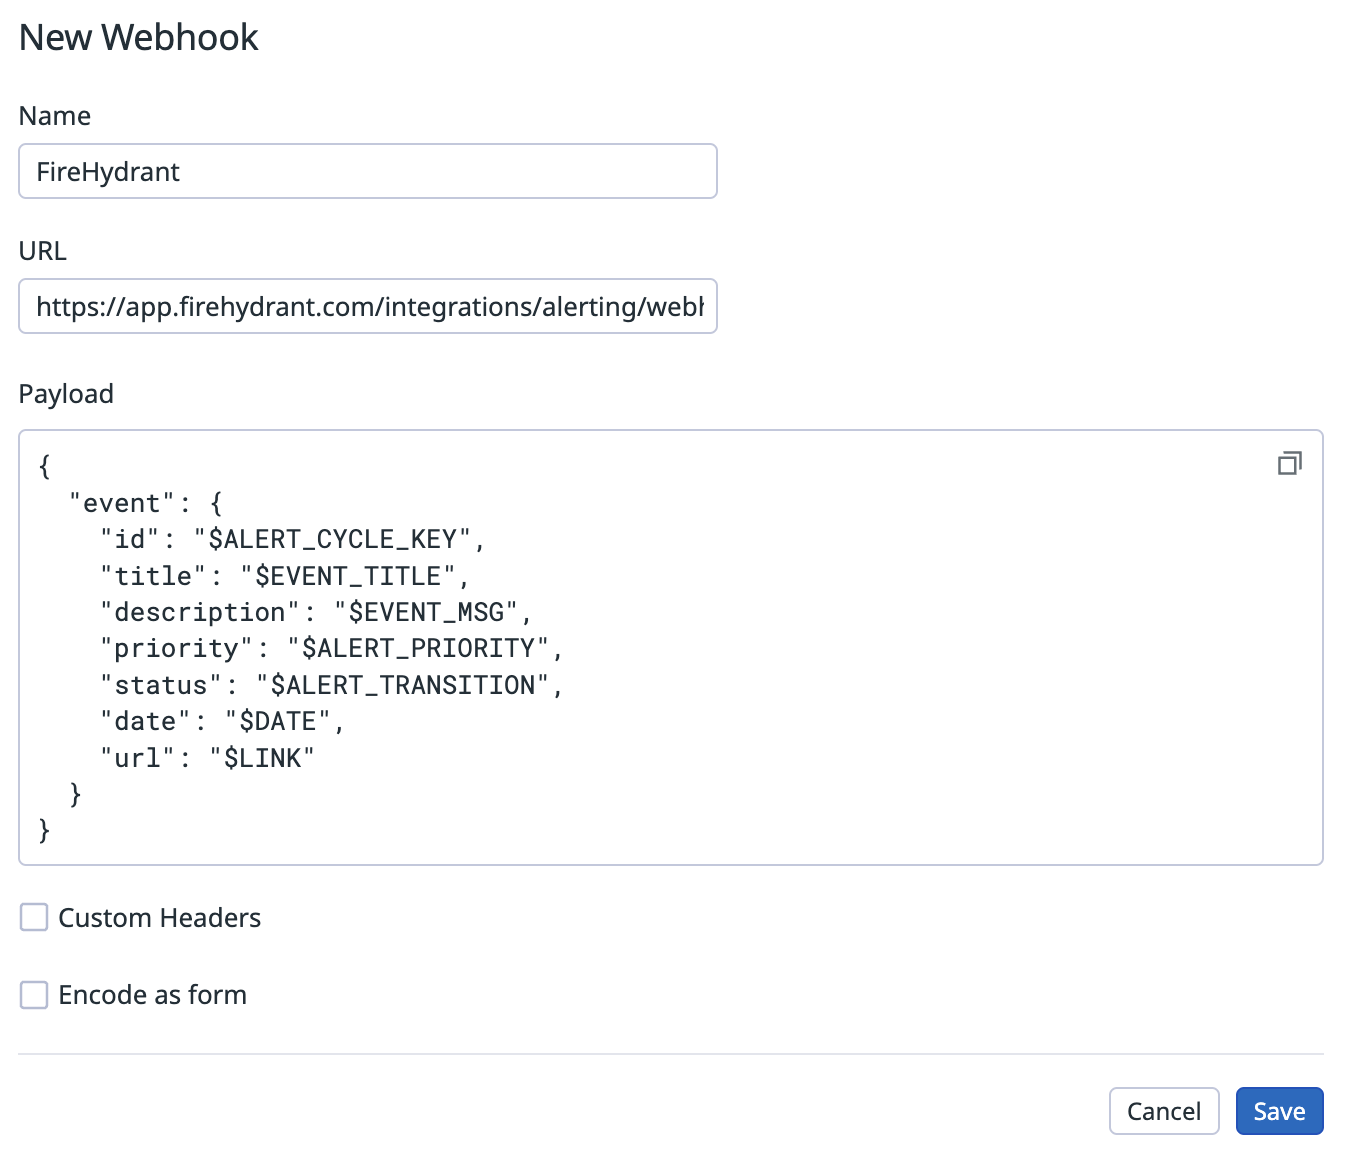
Datadog's new webhook modal
- Save your new webhook. Then, navigate to Monitors in the navigation sidebar and find the monitor you'd like to forward triggered alerts to FireHydrant.
- Click the gear icon in the upper right corner on the monitor's page, and then Edit to open the monitor's form.
- In the Notify your team section, select your new webhook from the Notify your services and your team members dropdown below the message template. Selecting the webhook should insert the proper template fragment to route alerts to your webhook in FireHydrant.

Datadog monitor form
- At the very bottom of the page, click the Save button or the Test Notifications button to send a test alert to FireHydrant. You should see the alert logged on the Datadog integration page in FireHydrant (where you originally got the webhook URL) under the Alert Routing tab.
Using Alert Routes with Datadog
Once your Datadog instance is configured, you can set up Alert Routes to take action on your alerts based on the data included in the alert. You can automatically open new incidents, send alerts to any Slack channel, log an alert in FireHydrant, or ignore it. To learn more, read about Alert Routes.
Service Catalog Import Setup
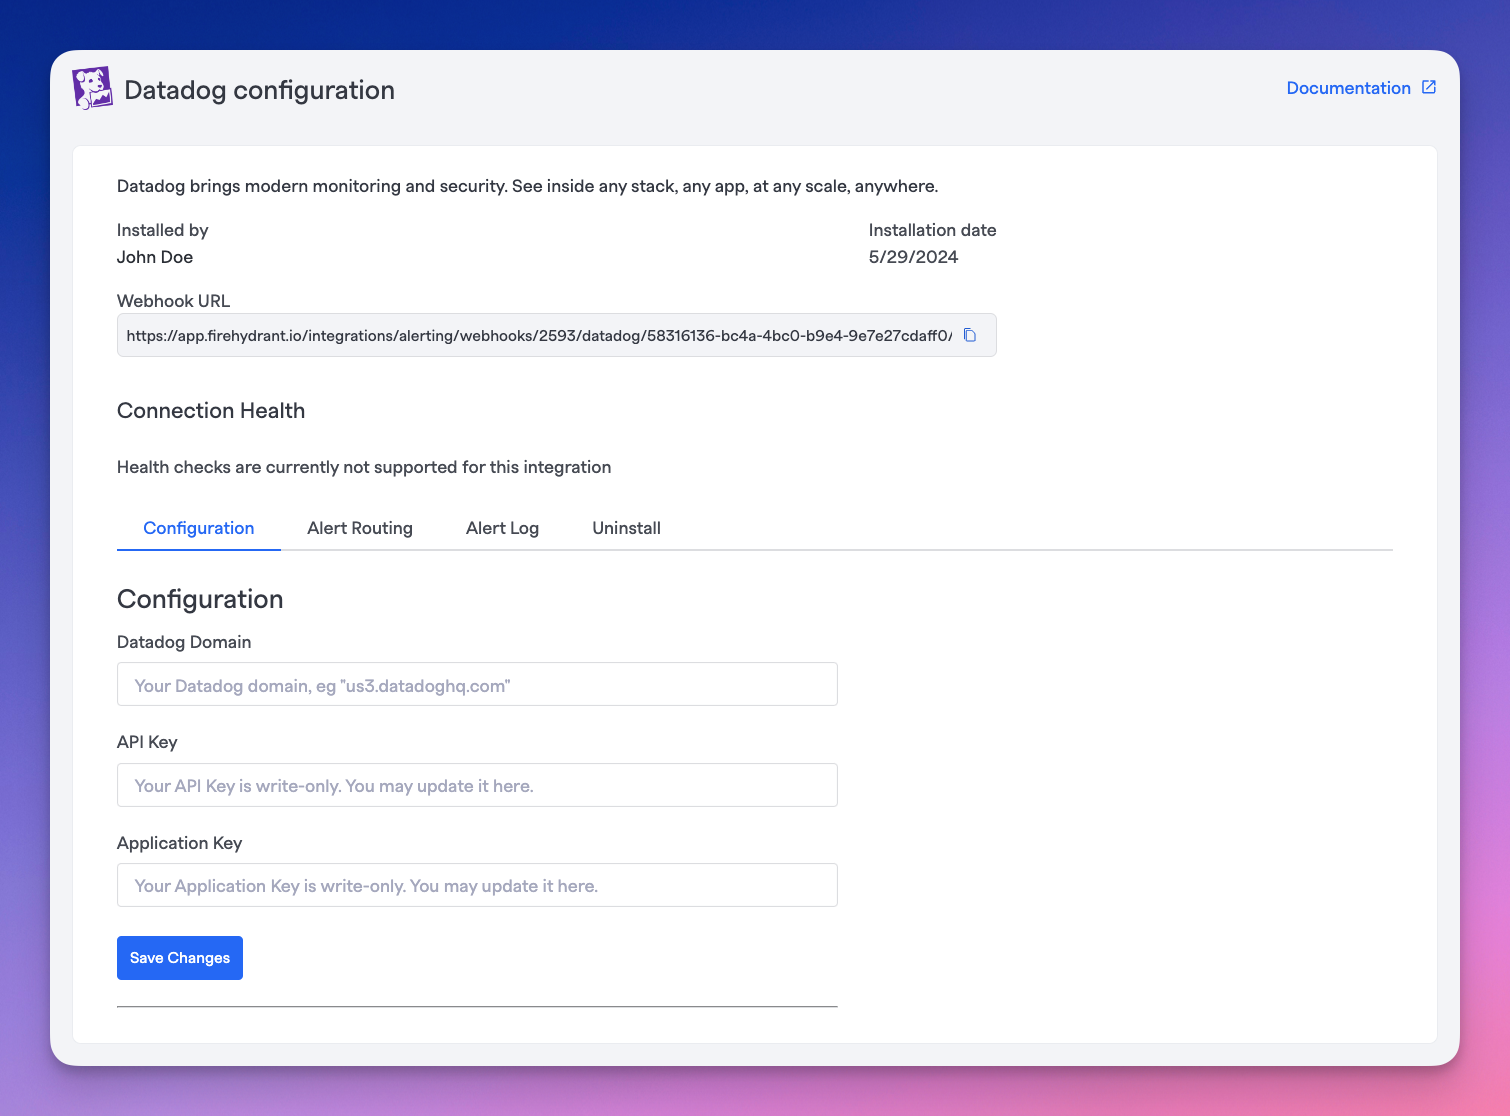
Datadog configuration page in FireHydrant
Following the initial setup in the previous section, the Datadog configuration page in FireHydrant should now have a Configuration tab where you can insert parameters. You must fill this out and save in order to import services from Datadog.
- Datadog Domain - The domain for your instance of Datadog, typically one of the following values:
app.datadoghq.com
us3.datadoghq.com
us5.datadoghq.com
app.datadoghq.eu
app.ddog-gov.com
ap1.datadoghq.com- API Key - The API key generated in Datadog. This can be found under your Organization Settings> API Keys
- Application Key - The application key configured in Datadog. This can be found under your Organization Settings> Application Keys.
- Note: This application key must have the
apm_service_catalog_readscope (or be unscoped)
- Note: This application key must have the
All three parameters above must be supplied the first time this is configured. This is to ensure we don't receive partial configurations. However, any subsequent updates can be made to individual fields.
Once this is done, you can use the Datadog import option when Importing and Linking Components.

Importing services from Datadog
Service Schema Support
FireHydrant now supports importing services from Datadog regardless of schema version. This includes:
- Services using schema version 2.2 - Full support with all schema 2.2 fields mapped
- Services using other schema versions - Now supported with automatic mapping to FireHydrant fields
- Services with no schema defined - Can be imported and will use available metadata for configuration
Previously, only services using schema version 2.2 could be imported. The updated importer now automatically handles schema variations and applies sensible defaults for services that don't conform to a specific schema version.
Updated 3 months ago