SCIM Configuration
System for Cross-domain Identity Management ( SCIM ) ensures the highest level of security for managing user identity and provisioning. SCIM will allow for user onboarding automation while maintaining user roles and access across any team or company size.
We now comply with the SCIM 2.0 protocol, which allows compatibility with any identity provider supporting SCIM. Below, we’ll document or link to supported providers, including Okta, Azure AD, Ping, and OneLogin.
Supported SCIM Features
FireHydrant's SCIM integration supports the following features:
User Lifecycle Management
- Push New Users: Automatically create user accounts in FireHydrant when assigned in your identity provider
- Push User Updates: Sync changes to user attributes (first name, last name, email)
- Push User Deactivation: Automatically deactivate users in FireHydrant when unassigned or deactivated in your identity provider
- Reactivate Users: Reactivate previously deactivated users when reassigned
Group Management
- Push Groups: Create and sync groups from your identity provider to FireHydrant teams
- Push Group Memberships: Automatically update team memberships based on group assignments
- Remove Group Memberships: Remove users from teams when removed from groups
Attribute Synchronization
- First Name: Synced from identity provider
- Last Name: Synced from identity provider
- Email: Synced from identity provider (primary identifier)
- Phone Numbers: Synced from identity provider (can be added, updated, or removed)
- Role: Synced via SAML attributes (Owner, Admin, Member, Observer)
- Username: Cannot be updated via SCIM after initial creation (email is used as username)
Query Operations
- Query Users: Identity provider can query existing FireHydrant users
- Query Groups: Identity provider can query existing FireHydrant teams
Unsupported Features
Profile Sourcing (Profile Mastering): Not Supported
FireHydrant does not support Profile Sourcing. In our integration, your identity provider (Okta, Azure AD, etc.) serves as the authoritative source of truth for all user data. User profile information flows unidirectionally from your identity provider to FireHydrant via SCIM provisioning. Changes made to user profiles within FireHydrant do not synchronize back to your identity provider's directory.
Password Synchronization: Not Supported
FireHydrant does not support password synchronization via SCIM. Our platform utilizes SAML-based Single Sign-On (SSO) for authentication, where users authenticate directly through your identity provider. When users are provisioned via SCIM, FireHydrant internally generates a random password; however, this password is not used for authentication. All user authentication flows exclusively through your identity provider's SSO mechanism. Any password values sent in SCIM provisioning requests are intentionally ignored.
Import Operations: Not Supported
- User Import: Pulling existing FireHydrant users into your identity provider is not supported
- Group Import: Pulling existing FireHydrant teams into your identity provider is not supported
- Group Linking: Linking existing identity provider groups to existing FireHydrant teams requires manual configuration
Note:SCIM provides one-way provisioning from your identity provider to FireHydrant. Changes made directly in FireHydrant will not sync back to your identity provider.
Prerequisites
- You must be on an Enterprise plan to access SCIM. Please contact our sales team to learn about upgrading your plan.
- You will need Owner permissions to configure SCIM settings.
- You'll also need to create an API Key to authenticate webhooks from your IDP to FireHydrant. Remember to keep this key somewhere handy.
Enabling SCIM with a supported identity provider
Each identity provider that adheres to SCIM 2.0 standards can connect to our endpoints when creating a custom SAML & SCIM setup. If we are not a verified provider with your identity provider, you’ll need to create a custom app to point to FireHydrant via SAML.
From here, you can set up a custom SCIM configuration to point to our SCIM Base URL. Authentication would use Basic Auth as an HTTP Header with a Bearer API Token using the generated FireHydrant API key.
- US Region:
https://api.firehydrant.io/v1/scim/v2 - EU Region:
https://api.eu.firehydrant.io/v1/scim/v2
Then, you can set provisioning parameters to specific user attributes within your provider. To see those user attributes that you can provision in our endpoints take a look at our developer documentation.
Okta SCIM Configuration
FireHydrant supports SCIM provisioning through Okta in two ways:
- Using the FireHydrant OIN Application (Recommended for OIN users)
- Using a Custom SAML 2.0 Integration (For advanced configurations)
Choose the appropriate method based on your setup.
Supported Features
FireHydrant supports the following provisioning features in Okta:
To App (Okta → FireHydrant)
- Create Users: Users assigned to the FireHydrant application in Okta are automatically created in FireHydrant with their configured roles and attributes
- Update User Attributes: Changes to user first name, last name, email, and custom attributes in Okta automatically sync to FireHydrant
- Deactivate Users: Users unassigned or deactivated in Okta are automatically deactivated in FireHydrant
- Reactivate Users: Previously deactivated users are automatically reactivated when reassigned in Okta
Group Provisioning
- Push Groups: Okta groups can be pushed to FireHydrant and created as Teams
- Push Group Memberships: Users added to or removed from Okta groups automatically have their FireHydrant team memberships updated
- Update Group Names: Changes to group names in Okta sync to team names in FireHydrant
These features are configured in the To App section of your Okta FireHydrant application under the Provisioning tab.
📓 Note: Profile Sourcing, Password Sync, User import, Group import and Group linking features are not currently supported.
Important for Okta Administrators:Do not use the "Import" tab in the Okta Admin Console for the FireHydrant application. The Import feature queries FireHydrant for existing users but does not properly provision them through SCIM.
Instead:
- Use the Assignments tab to assign users to the FireHydrant application
- Use Push Groups to provision groups from Okta to FireHydrant
- Assigned users and pushed groups will be automatically created in FireHydrant via SCIM
Why Import Is Not Supported
Okta's Import feature is designed for two-way sync scenarios where an application can have users that exist outside of Okta's provisioning system. FireHydrant's SCIM implementation follows a push-only model where:
- All users in FireHydrant should be provisioned from Okta via assignment
- Okta is the source of truth for user identity
- FireHydrant does not provision users back to Okta
Using the correct provisioning flow (Assignments + Push Groups) ensures proper user lifecycle management and prevents synchronization issues.
Option 1: Configure SCIM Using FireHydrant OIN Application (Recommended)
This is the recommended approach for most organizations using the FireHydrant application from the Okta Integration Network.
Step 1: Enable Provisioning in Okta OIN App
- In Okta, go to Applications > Applications
- Select your FireHydrant (Enterprise) application (from OIN)
- Go to the Provisioning tab
- Click Configure API Integration
- Check Enable API integration
- Paste the API Token from FireHydrant
- Click Test API Credentials
- Once successful, click Save
Step 2: Enable Provisioning Features
- In the Provisioning tab, click To App settings
- Enable the following features:
- Create Users: Push new user assignments to FireHydrant
- Update User Attributes: Sync attribute changes to FireHydrant
- Deactivate Users: Deactivate users in FireHydrant when unassigned
- Click Save
Step 3: Configure Push Groups (Optional)
If you want to sync Okta groups to FireHydrant teams:
- In your FireHydrant OIN application, go to the Push Groups tab
- Click Push Groups dropdown and select:
- Find groups by name: To link an existing Okta group
- Find groups by rule: To push groups matching specific criteria
- For each group you want to push:
- Search for and select the Okta group
- Choose to either:
- Link to existing FireHydrant team: Select an existing team from the dropdown
- Create new team: FireHydrant will create a new team with the group name
- Click Save
- The group and its members will be pushed to FireHydrant automatically
Important:Only users who are both members of the pushed group AND assigned to the FireHydrant application in Okta will be added to the corresponding team in FireHydrant.
Step 4: Assign Users
- Go to the Assignments tab in your FireHydrant application
- Click Assign and select Assign to People or Assign to Groups
- Assign users or groups to the FireHydrant application
- Users will be automatically provisioned in FireHydrant
User Attribute Update Restrictions
Immutable Attributes
The following attributes cannot be changed after initial user creation:
userName (Primary Email)
- Once a user is created with a specific userName (email address), this identifier becomes permanent
- This is used for SAML SSO authentication and audit logging
- Why: Changing the primary identifier would break authentication flows and audit trails
- Workaround: If a user's email changes, deactivate the old user in Okta and create a new user with the updated email
password
- Password management is not supported via SCIM
- FireHydrant uses SSO-only authentication for SCIM-provisioned users
- Any password values sent during provisioning are ignored
- Why: FireHydrant uses SSO-only authentication for provisioned users
Updatable Attributes
All other attributes can be freely updated via SCIM:
- ✅ name.givenName - First name
- ✅ name.familyName - Last name
- ✅ emails - Alternative email addresses (display purposes)
- ✅ phoneNumbers - All phone numbers (mobile, work, etc.)
- ✅ roles - User role assignments
- ✅ active - User activation status
Important Notes
Email Case SensitivityFireHydrant does not support case-sensitive emails. Two users cannot have emails that differ only by character casing. For example,
[email protected]is treated as identical to[email protected].
Email vs userNameWhile the email field can be updated for display purposes, the userName field (which is also an email) serves as the immutable authentication identifier.
Option 2: Configure SCIM Using Custom SAML 2.0 Integration
This approach is recommended if you need advanced customization .
Prerequisites
- Custom SAML 2.0 application created in Okta
- SCIM enabled in the custom application settings
These instructions assume that you are either:
- Setting up SAML for the first time with FireHydrant, or
- You plan on setting up a combination SAML + SCIM app for FireHydrant, reassigning your users to that for login, and removing your old SAML app
If you plan on keeping an existing SAML app and having the SCIM configuration separate, follow steps 1-3 under Configuring SSO and all of the steps under Configuring SCIM.
- First, follow the instructions here to set up your organization with Okta SSO.
- From within the Okta app, click into Provisioning> Configure API Integration > Enable API Integration. Paste the FireHydrant API token into the API token field. You can optionally choose to import groups at this point.
- Click Test API Credentials to verify the connection and Save.
- Enable Create, Update, and Deactivate actions.
- (Optional) If your SCIM app is separate from SSO, go to General and select Do not display application icon to users.
Note:FireHydrant does not support case-sensitive emails. Please ensure that your users' emails are case-insensitive. For example, two users cannot share emails that only differ by character casing:
[email protected]is treated as being equal to[email protected].
Push Groups
FireHydrant supports Okta Push Groups, allowing you to automatically sync Okta groups to FireHydrant teams. When you push a group, FireHydrant will:
- Create or link to a FireHydrant team
- Automatically add group members to the team
- Keep team memberships synchronized with Okta
- Remove users from teams when removed from Okta groups
Prerequisites
Before configuring Push Groups, ensure you have:
- SCIM provisioning enabled (see steps above)
- API token configured and tested
- Users assigned to the FireHydrant application in Okta
Note:Only users who are both members of the Okta group AND assigned to the FireHydrant application will be added to the corresponding team in FireHydrant.
Configure Push Groups (OIN Application)
Simplified for OIN UsersWhen using the FireHydrant app from the Okta Integration Network (OIN), Group Push is pre-configured. You do not need to:
- Manually enter SCIM Base URLs
- Re-enter API tokens for group operations
- Configure custom SCIM endpoint URLs
Simply populate the API Token during initial SCIM setup, and Group Push will be fully functional.
-
In the Okta Admin Console, go to Applications → Applications
-
Select your FireHydrant application (from OIN catalog)
-
Click the Push Groups tab
-
Click the Push Groups dropdown button
-
Select your push method:
- Find groups by name: Search for and select specific Okta groups
- Find groups by rule: Push all groups matching a pattern (e.g., groups starting with "FH-")
-
For each group you want to push:
- Search for the Okta group by name
- Select the group from the results
- Choose one of the following:
- Create new team: FireHydrant will create a new team with the same name as your Okta group
- Link to existing team: Select an existing FireHydrant team from the dropdown (recommended if teams already exist)
- Optionally, uncheck "Push group memberships immediately" if you want to review before syncing
- Click Save
-
The group will appear in your Push Groups list with status Active
-
Members will be automatically synced based on your settings
Push Groups Management
After configuration, you can:
- Push Now: Manually trigger an immediate synchronization
- Deactivate: Stop syncing a group without deleting the team
- Unlink: Disconnect the Okta group from the FireHydrant team
- View Status: Check sync status and last update time
Handling Deactivated Users
If a user in a pushed group has been deactivated in FireHydrant:
- The user will be skipped during group sync
- A warning will be logged (visible in API responses)
- Active group members will sync normally
- No errors will be thrown
Troubleshooting Push Groups
Issue: Group doesn't appear in "Find groups by name"
- Solution: Ensure the group exists in Okta and contains at least one member
Issue: Users aren't syncing to FireHydrant team
- Solution: Verify users are assigned to the FireHydrant application in Okta (Assignments tab)
Issue: "User does not exist" error
- Solution: Ensure users are provisioned to FireHydrant first (via user provisioning) before adding them to pushed groups
Issue: Timing conflicts during initial setup
- Solution: Enable user provisioning first, allow users to sync, then configure Push Groups
Advanced: Custom SCIM Integration (Non-OIN)
If you're using a custom SCIM integration instead of the FireHydrant OIN application, you'll need to manually configure SCIM endpoints and credentials. This is typically only required for:
- Multi-organization setups
- Custom attribute mappings
- Advanced automation requirements
For custom integration setup, contact FireHydrant support.
ADVANCED: How to push groups into FireHydrant as Teams
FireHydrant supports Okta push groups, allowing you to push the memberships of a group in Okta into FireHydrant. Only employees in the group and assigned to the FireHydrant app in Okta will be pushed. FireHydrant currently only supports push groups with manual configurations of the SCIM app. See our instructions below:
Note:If you plan on implementing push groups, we strongly recommend configuring the custom application to perform SAML, SCIM, and push groups to reduce the likelihood of timing issues during app assignment.
- As an administrator in Okta, go to Applications > Applications > Create App Integration.
- Select SAML 2.0 and click Next.
- Enter a name for your app (we recommend FireHydrant) and click Next.
- This next page has you set up SSO. If you are also configuring the app for SSO, use the attribute statements listed below. If you will be using a separate SSO app, enter
http://nullinto the SSO URL and Audience URI fields. Click Next once complete.
| Name | Name Format | Value |
|---|---|---|
| First Name | Unspecified | user.firstName |
| Last Name | Unspecified | user.lastName |
- Select that you are an Okta customer adding an internal app and click Finish.
- Click into the General tab, then Edit for App Settings, and enable SCIM under Provisioning. Save. The Provisioning tab will be available when the page is refreshed.
- Click into the Provisioning tab and configure the SCIM connection as follows
- SCIM connector base URL:
https://api.firehydrant.io/v1/scim/v2(US region) orhttps://api.eu.firehydrant.io/v1/scim/v2(EU region)- Unique identifier field for users:
userName- Supported Provisoning Actions: All available actions
- Authentication Mode: HTTP Header
- Authentication: Enter the API key token created under Requirements to get started
Save the configuration. The Push Groups tab will then be available.
- Authentication: Enter the API key token created under Requirements to get started
- Authentication Mode: HTTP Header
- Supported Provisoning Actions: All available actions
- Unique identifier field for users:
- SCIM connector base URL:
- (Optional) To support role assignments from Okta, go to Provisioning > To App > Profile Editor and add a Role attribute with the following configuration:
- Data Type: string array
- Display Name: Roles
- Variable Name:
roles - External Name:
roles - External Namespace:
urn:ietf:params:scim:schemas:core:2.0:User - Description (optional): Refers to a user's FireHydrant role.
- Enum: Enabled
- Attribute Members:
| Display Name | Value |
|---|---|
| Owner | owner |
| Member | member |
| Collaborator | collaborator |
| Viewer | viewer |
| [Any of your custom roles] (see docs here) | your-custom-role-slug-here |
- Save. You can now enable provisioning actions for Create, Update, and Deactivate and access a Push Groups tab to configure creating or linking groups between Okta and FireHydrant.
- In the SCIM application, go to the Push Groups tab
- Click + Push Groups and select the push group type you want to perform
- Enter the name of the Okta group and select to either link to an existing team in FireHydrant or create it brand new
- Save to start pushing the group. This completes Okta SCIM setup.
Google Workspace
While we do not have a published app with Google Workspace, this guide walks you through repurposing an existing marketplace app to use for for SSO and Provisioning. This is due to a limitation with Google where creating a custom SAML app will not allow you to enable provisioning.
Configuring SSO and SCIM
These steps assume that you are setting up SSO from scratch and want to use the same application to manage SSO and SCIM. If you have already completed the guide to enable Google SSO, follow Steps #1 and #2 here, then skip to Step #4.
- As a Google Workspace Super Admin, go to Apps > Web and Mobile Apps.
- Click Add app > Search for apps and locate an existing app that supports Web (SAML) and provisioning, such as Adobe. Click to add it. It will take you to a page to view the SSO URL, Entity ID, and certificate.
- If you already have an existing SSO app, enter null values such as
http://nullwhen prompted for SAML details
- If you already have an existing SSO app, enter null values such as
- Follow steps 4-10 in this guide.
- On the main app page that it takes you to, click into the Autoprovisioning section
- Click the button under App Authorization
- As a FireHydrant Owner, go to Organization (Settings in the new beta UI) > API keys and click Create API key, name the token, and copy it
- Paste it into the Access token box and click Authorize.
- Click the button under Endpoint URL and enter
https://api.firehydrant.io/v1/scim/v2(US region) orhttps://api.eu.firehydrant.io/v1/scim/v2(EU region) - Click the button under Deprovisioning and set your preferences on how to handle accounts in FireHydrant when an app is unassigned from a user or an account is suspended or deleted in Google.
- Under Status click Turn On. This will start provisioning users that have been scoped for the application.
Entra ID (Azure AD)
Note:This section assumes that you've already created a SAML app in Entra ID following these instructions.
Microsoft Entra ID Team Management
FireHydrant supports managing teams via SCIM groups for Microsoft Entra ID. Entra ID manages groups via PATCH requests, allowing you to:
- Create and update Teams in FireHydrant based on Entra ID groups
- Manage team memberships automatically
- Sync group changes to FireHydrant teams
Note:Group roles are currently not supported for Microsoft Entra ID SCIM integration. Role assignments must be configured at the user level.
-
As an identity administrator in Entra ID, navigate to the SAML app you've created and click into the Provisioning tab. Click into Provisioning again on the next screen.
-
Click Admin Credentials and enter the following information:
- Tenant URL:
https://api.firehydrant.io/v1/scim/v2(US region) orhttps://api.eu.firehydrant.io/v1/scim/v2(EU region) - Secret Token: API key generated following these instructions
- Click Test Connection and save.
- Tenant URL:
-
(Optional) In order to have a specific FireHydrant role assigned to your users during provisioning, you’ll need to configure App Roles. From the Entra Portal, click into Applications > App registrations.
-
From the All applications tab, select the SAML app you've created and navigate to App roles.
-
Select Create app role and configure it as follows:
- Display name: owner
- Allowed member types: Users/Groups
- Value: owner
- Description: FireHydrant Owners
- Do you want to enable this app role?: Checked
-
Repeat the same steps for all 4 FireHydrant roles (plus any of your custom roles you may have created. You should have a configuration like this:
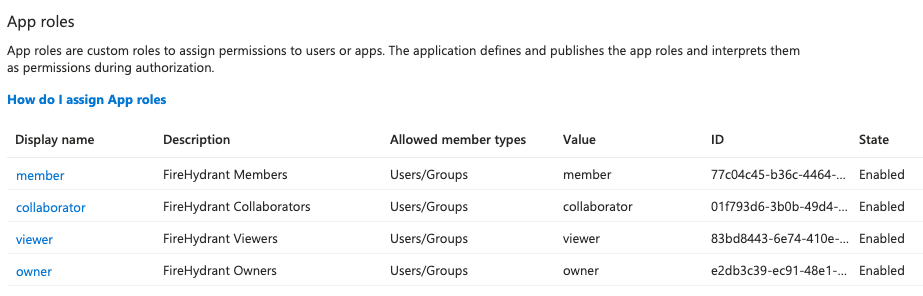
Entra App Roles for the out-of-box defaults. You may have more entries for any custom access roles you've created in FireHydrant.
-
When assigning Users to your SAML app, select the Role that they should have assigned in FireHydrant.
Note:Please keep the value and display name the same. They should always be set to lowercase.
-
-
Navigate back to your SAML app and click into the Provisioning tab, click Attribute mappings and click into Provision Microsoft Entra ID Users
-
Under Target Object Actions, select the provisioning actions you want Entra to take on users in FireHydrant
-
Under Attribute Mappings, click Add New Mapping and configure it as follows:
-
If you have completed Step 3, use this config:
- Mapping Type: Expression
- Expression: SingleAppRoleAssignment([appRoleAssignments])
- Target Attribute: roles[primary eq "True"].value
- Click Ok to save your changes.
- Click Save at the top.
-
If you have not completed Step 3, use this config:
- Mapping Type: Constant
- Constant Value: Use one of the 4 FireHydrant roles, which will be the default role assigned to ALL users:
owner,member,collaboratororviewer. - Target Attribute: roles[primary eq "True"].value
- Click Ok to save your changes.
- Click Save at the top.
Using SCIM endpoints without an IDP
Our SCIM provider can be used without SSO, but we strongly recommend implementing it. Otherwise, newly created users in FireHydrant will need to use the “Forgot password” flow to set a new password before logging in. SSO also helps you enforce your IDP's security policies across more applications.
If you still want to configure SCIM without an IDP, the following instructions will help guide you. All requests must use our API key made with the following headers:
  --header 'Content-Type: application/scim+json; charset=utf-8' \
  --header 'Accept: application/scim+json'
You can make the following requests to our SCIM API:
- Fetch a list of Users or single User
- Create, Update, or Delete a new User object
- Fetch a list of Groups or single Group
- Create, Update, or Delete a new Group object
To see each request in depth feel free to visit our API support documentation, particular the SCIM section.
You can also easily download these requests when visiting our Postman Collection here.
New User Sign-in Flow
Once Users are created and have access established, they can be directed to login to FireHydrant.com.
SSO Enabled : Users should be directed to click Sign in with SSO. The login process for these new users will redirect them to verify with the identity provider. Once the user validates with the identity provider they will be automatically granted access to FireHydrant.
SSO Not Enabled and password is not defined : If your admin used the public endpoint or identity provider to create new users and did not pass in a user’s password to our POST route, the FireHydrant app will automatically create a hardened password for the user on our backend. Newly created users will need to follow these instructions to login if SSO is not enabled:
- The new user will need to visit our Forgot Password page.
- From here the user will need to enter their email used to create their account and reset their password.
- Once the user resets their password they will be able to login as normal.
SSO Not Enabled and password is defined: The password sent on user creation, by your admin, can be used to login with email and password at FireHydrant.com.
Additional Identity Providers
For any identity providers not covered here, you can find out more about adding SCIM and SAML by accessing the provider’s documentation.
Azure Ad
- SCIM: https://docs.microsoft.com/en-us/azure/active-directory/fundamentals/sync-scim
- SAML: https://docs.microsoft.com/en-us/azure/active-directory/fundamentals/auth-saml
Ping
- SCIM: https://docs.pingidentity.com/bundle/pingone/page/zae1571936635900.html
- SAML: https://docs.pingidentity.com/bundle/solution-guides/page/xck1629907079074.html
OneLogin
Support
If any issues persist during setup, please reach out to FireHydrant support here for further help!
Updated 4 months ago