On-Call Schedules
Managing On-Call Schedules
Creating a schedule
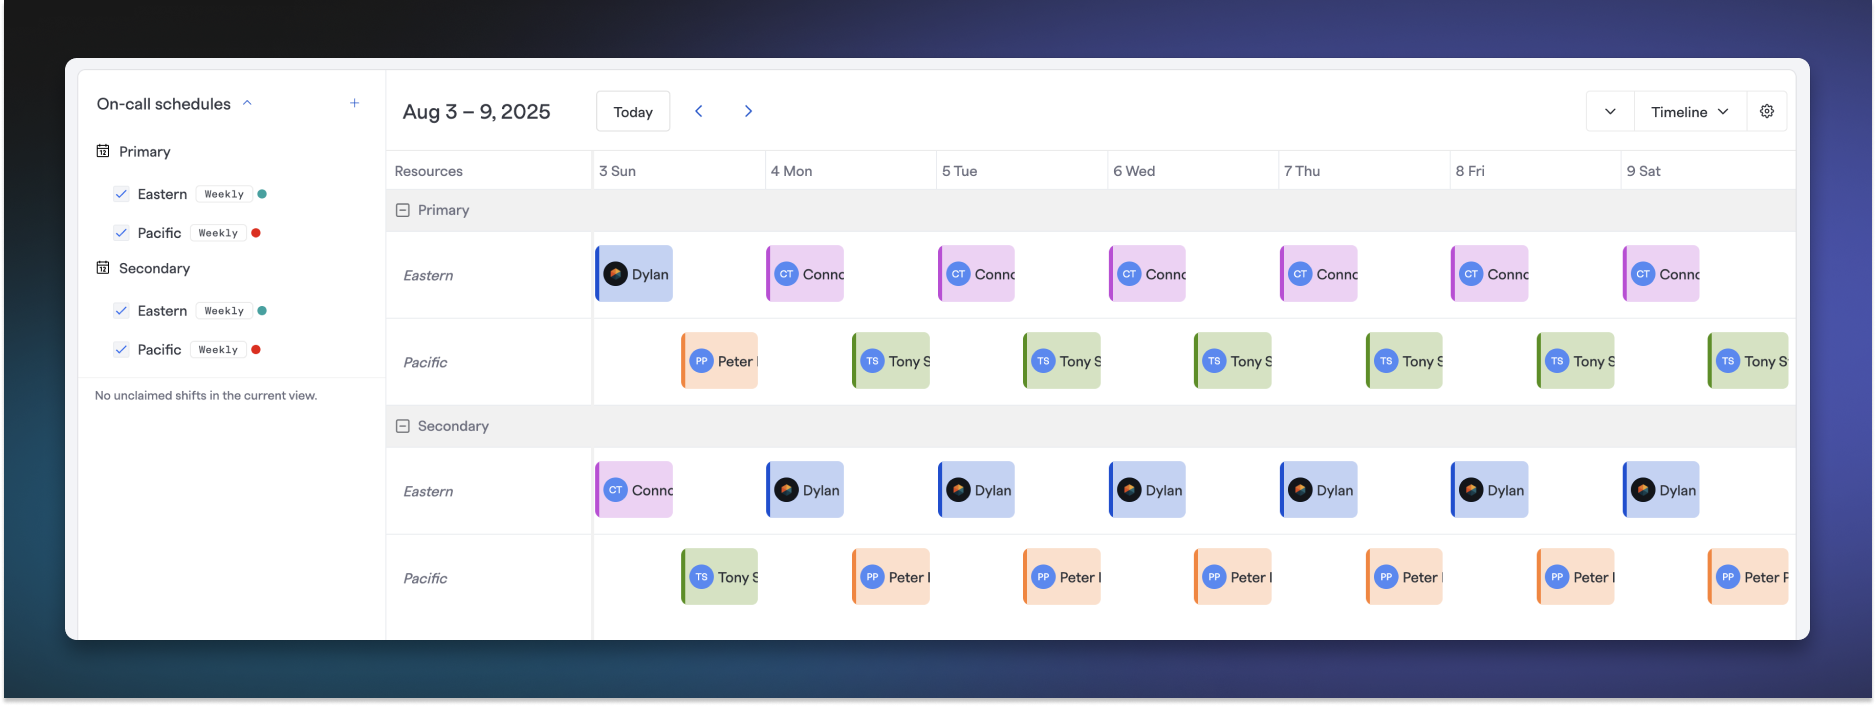
Create schedules with rotation to manage your team's on-call
On-call schedules help teams define rotations of people who respond to pages. When viewing a team's on-call schedules, all events are shown in the user's local timezone.
To create an On-Call Schedule for a team:
- Navigate to the team's page in FireHydrant (Teams > Team Name) and click on the "On Call Schedules" tab for the team.
- In the left-hand panel, click "New Schedule."
- Add a name and description to help you and other users of FireHydrant connect this on-call schedule to escalation policies. Select a color to help distinguish the schedule from other schedules on the calendar.
- Important: When an escalation policy targets a schedule, it will page all responders who are currently on-call across all active rotations within that schedule.
- Configure your first rotation with the following steps:
- Details: Add a name and description for your rotation, and set the timezone.
- Responders: Select team members and choose Shift Assignment:
- Rotation: Rotation-based shift assignment allows you to create a list of your team members. FireHydrant will automatically create shifts and assign users in the order you have them listed. This also allows for empty gaps in place of shifts.
- Manual: Manual shifts will generate the shifts without assigning a responder, allowing you to hand-select who to assign to each shift after the fact. Your team members can also claim shifts.
- Handoff Select a Daily, Weekly, or Custom Hand-off option to determine how often your rotation will hand off between on-call shifts. Customize the hand-off day of the week and time. Also set working hours:
- 24/7: responders will receive alerts from the start of the rotation until it's handed off to the next on-call responder.
- Specific days: select days of the week as well as time windows during which alerts will be delivered to the rotation. You can add multiple time windows that will apply all days
- Custom time windows: if you have specific time blocks where you want your on-call responders to receive alerts, you can craft custom start and end date-time pairs to create custom time windows.
- Notifications & Preferences
- Coverage gap notification: Configure notifications for gaps in coverage. These are Daily Slack + email messages sent at 9 am (set to the schedule's configured timezone) with a heads-up on unstaffed on-call gaps.
- Prevent shifts from being deleted: Optionally, prevent shifts from being deleted.
- Add additional rotations as needed to handle different coverage scenarios (e.g., business hours vs after-hours, follow-the-sun coverage, shadow rotations, or multiple simultaneous coverage).
- As you create your schedule and rotations, a live preview panel on the right side displays all rotations in real-time, allowing you to visualize your complete coverage setup before saving.
Viewing schedules
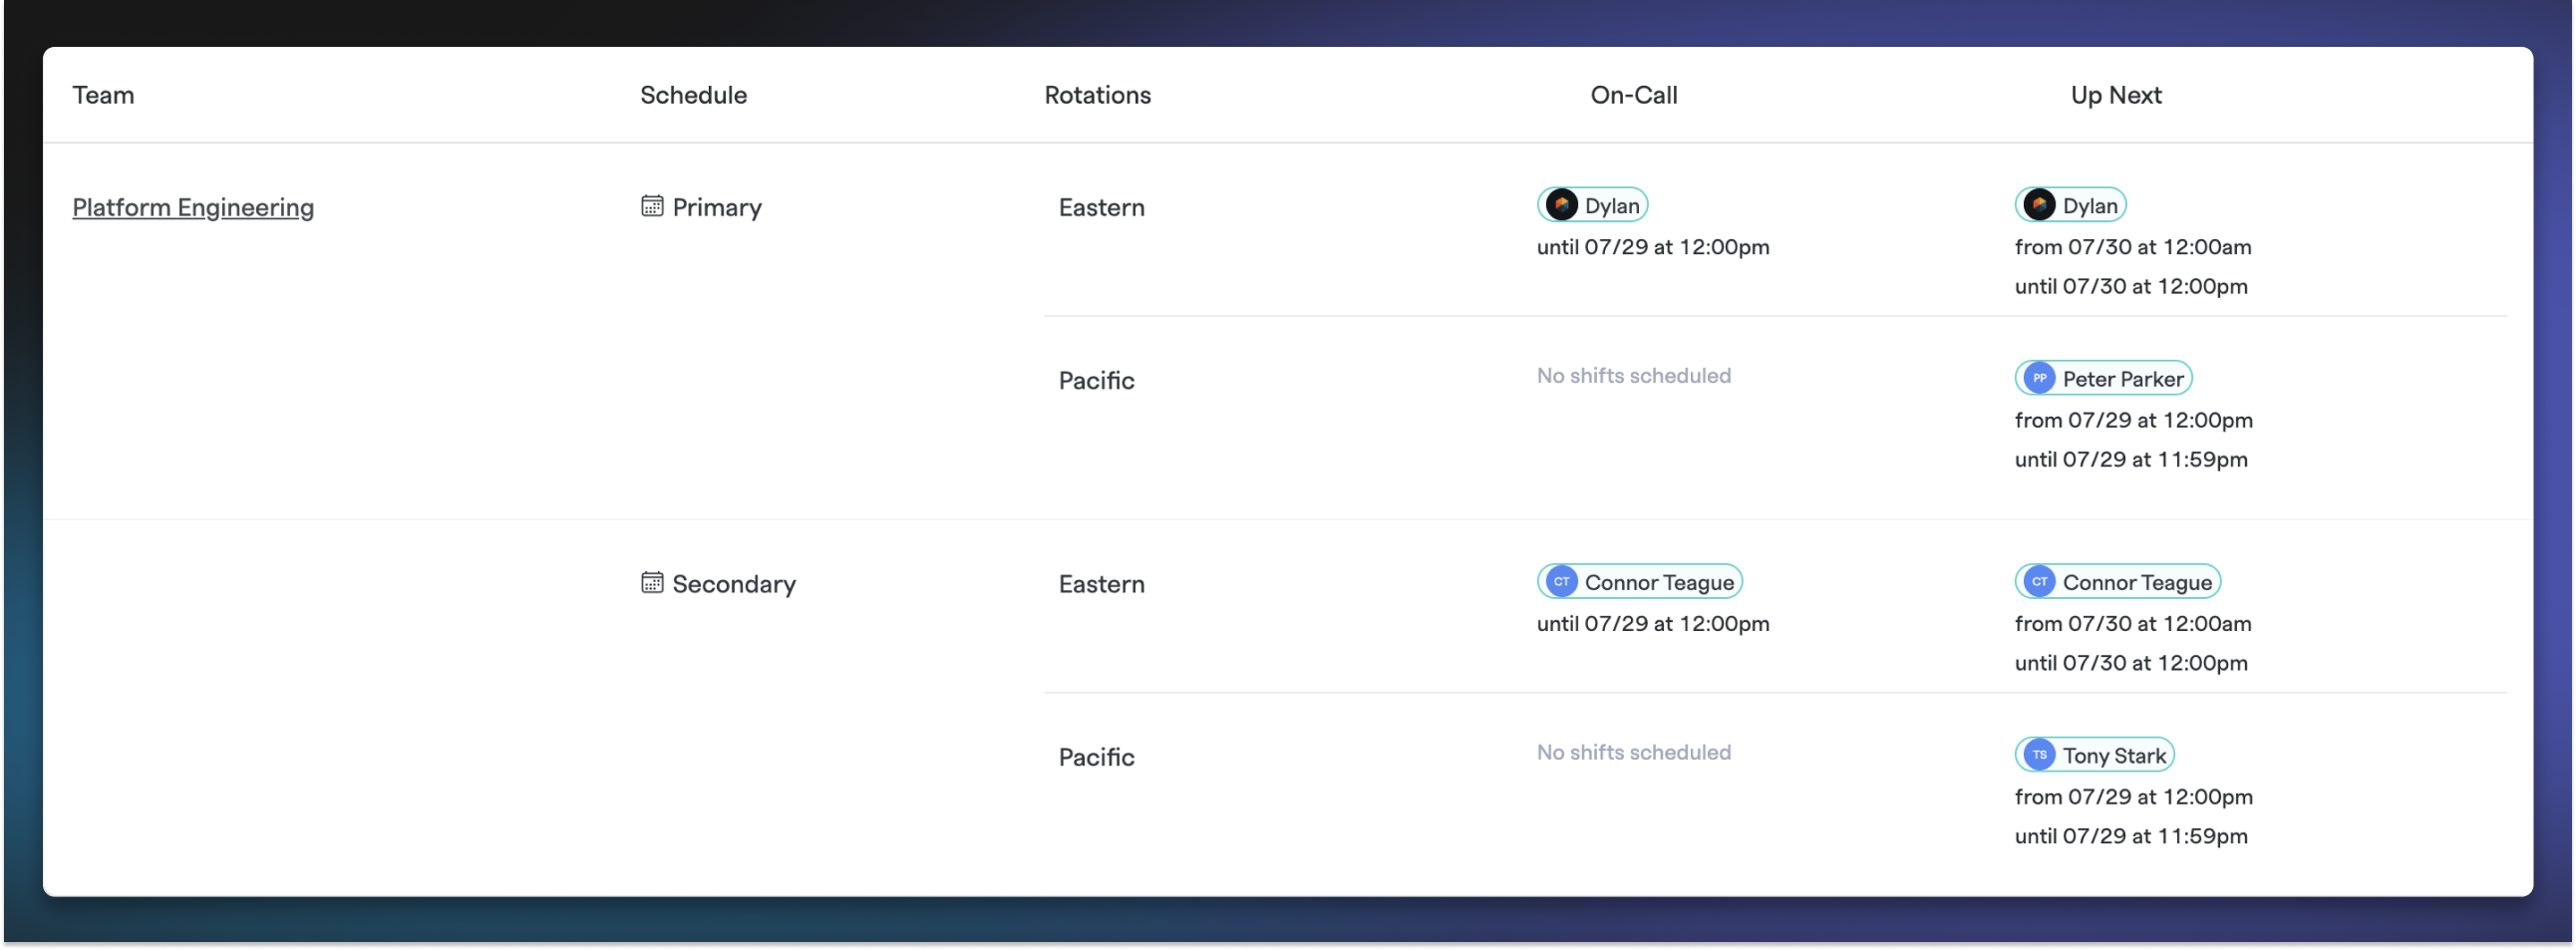
Org-wide on-call schedules list
On-call schedules across your organization can be viewed in Signals > On-Call Schedules. These will list all schedules and rotations by team along with whoever is on-call for them.

Team specific on-call schedule list
You can view the schedules for individual teams by going to the Team's page > On-call Schedules. On this page, you can filter which shifts you want to see and how:
- The Settings gear here allows you to change which day of the week to start on for the calendar views.
- All Shifts, Available Shifts, and My Shifts will toggle between which shifts to show
- Timeline will allow you to change the view between Month, Week, List, Timeline, and Current/Next Shifts viewing modes.
- You can also filter calendar displays to view individual rotations.
NOTE: Only 6 months of future on-call schedules are generated.
Editing Schedules & Rotations
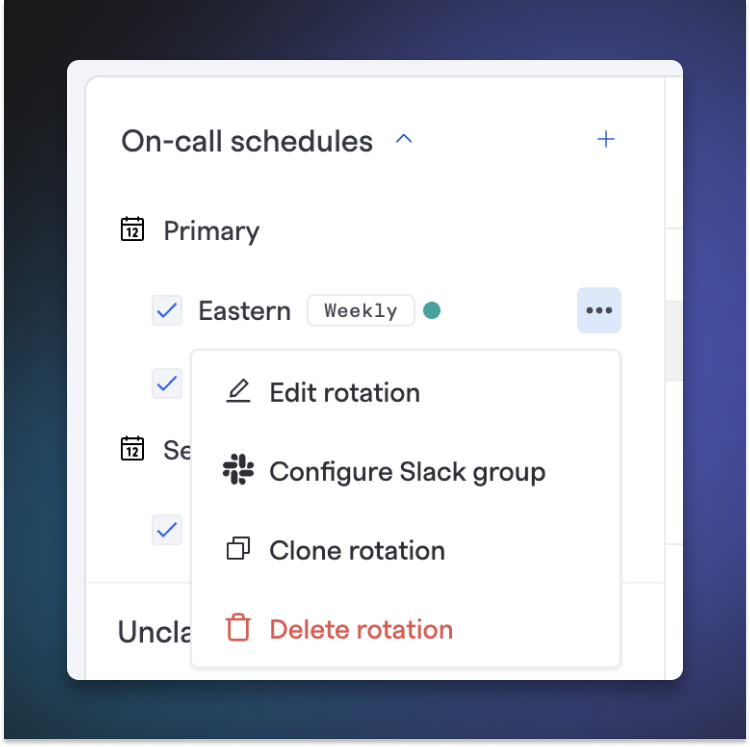
Edit Details: Editing the details of a schedule allows you to easily updates the name, description and color of your schedule.
Edit Rotation: Select a specific rotation to modify its configuration. Rotations can be edited independently - changes to one rotation won't affect others in the same schedule. When making changes, you can select a date to apply the changes you're making so you have precise control over when changes go into effect. The live preview updates as you make changes to any rotation.
Editing a Shift: From any shift view, in the calendar or in a card list, click on the shift and select Edit Shift in the context menu. You'll be able to change the on-call responder for the shift and can even shorten or lengthen the shift (though schedules do not allow for overlapping shifts).
Clone Rotation: On the team schedule view page, you can clone a rotation to another schedule within the same team. This copies all configuration settings and future shifts to the target schedule.
Delete Rotation: Individual rotations can be deleted without affecting other rotations in the schedule.
Syncing On-Call Schedules with Slack Groups
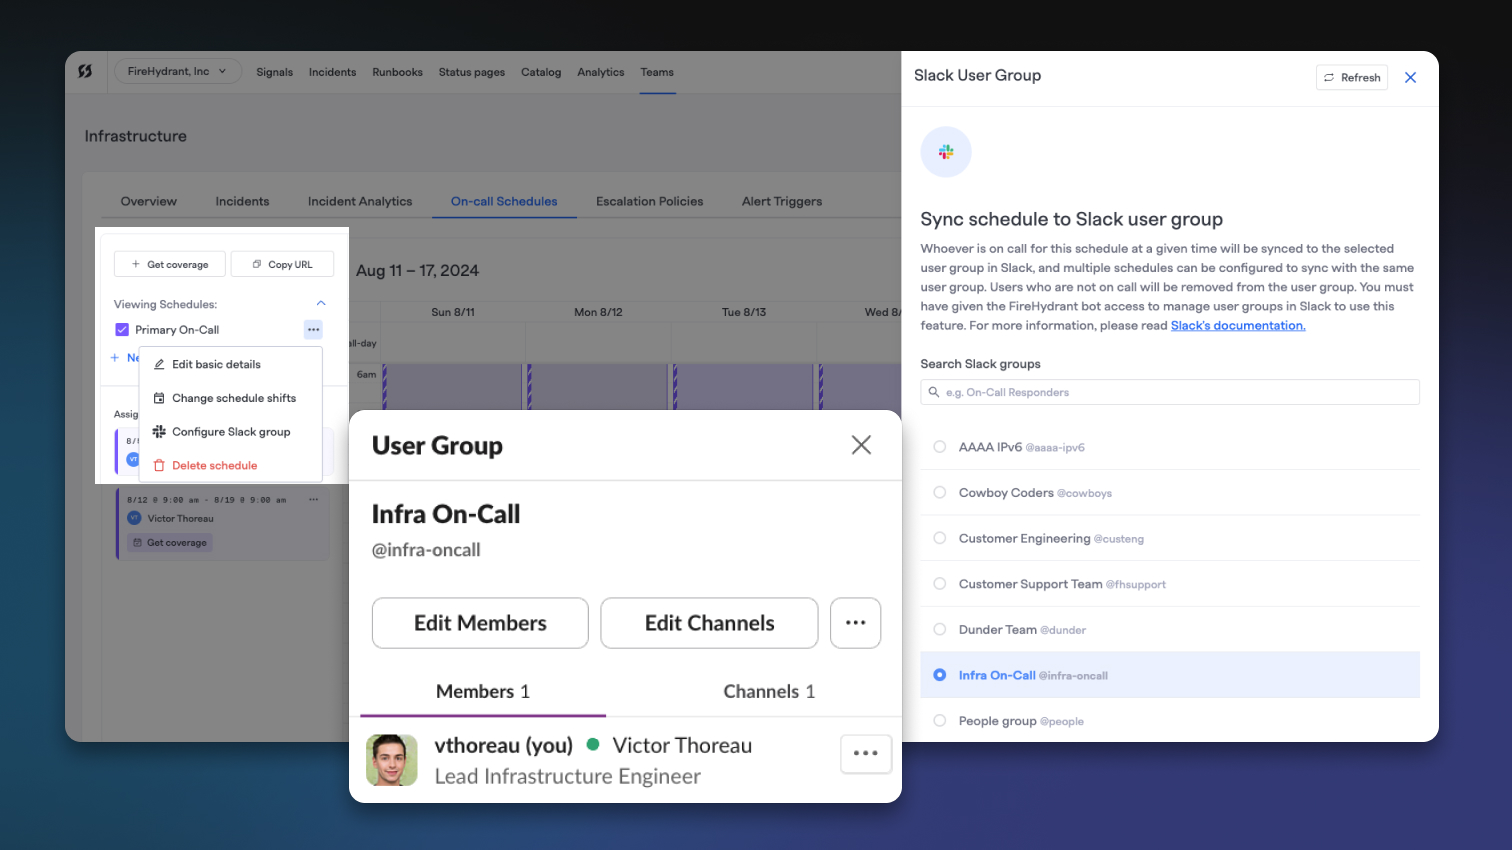
Infra On-Call Slack group sync'd with Infrastructure team's Primary On-Call schedule
FireHydrant offers a feature for synchronizing Slack groups with on-call schedules - by linking them, FireHydrant will automatically remove and add responders when their shifts rotate, allowing you to mention @group-name and ping whoever is on call for a specific schedule.
via Web App
- Update your user group permissions in Slack to allow "Everyone in the organization" to edit groups
- Slack does not provide a way for applications to manage user groups outside of that permission and apps cannot be owners or admins in a workspace. For more information, please read Slack's documentation.
- Navigate to your team's on-call schedules and click on the ellipses context menu next to any schedule you'd like to sync using the "Configure Slack group" menu item.
As we sync, the only users present in the Slack user group will be the users actively on call for those schedules. If a user is actively on call but not currently present in the synced Slack User Group, they will be added to the Slack user group. If a user is present in the Slack user group but is not actively on call, they will be removed from the Slack user group.
If the Slack user group is configured against multiple on-call schedules, we will perform the above process for each schedule. As we sync, the only users present in the user group will be the users actively on call for those schedules.
FireHydrant will disable/deactivate synced Slack user groups when no one is on call for any on-call schedules synced to that user group, as Slack does not allow user groups to be empty.
Schedules/user groups sync every 5 minutes.
Requesting Coverage for a Shift
For any shift where a responder has been assigned, that responder can request partial or full coverage for their shift. Responders can do this in both the web app and Slack.
via Web App
- Navigate to the On Call Schedules page for your team.
- In the right-hand column, find the “My Shifts” list.
- If you don’t see the My Shifts list, ensure you have unselected any Schedules in the left-hand column.
- Find the shift you’d like coverage for and click “Get Coverage.”
- Select a Start Date and Time and an End Date and Time.
- You can toggle between relative times (e.g., "cover me for 4 hours") or absolute times (e.g., "cover me from Wednesday, Jan 3rd, from 2:00pm - 4:00pm"
- For the coverage window you’re selecting, you’ll see a list of all shifts affected by the coverage request (if, for instance, you have a primary and secondary shift at the same time or your coverage window extends into two different shifts).
- Additionally, if coverage is for only part of a shift, you will see a representation of the time requested in the shift card.
- Click “Submit” to create your Coverage Request. Now, your teammates can claim this shift in Slack or the Web App.
via Slack
- In any channel in Slack, you can run the command
/fh cover meand you’ll be prompted to enter aFromDate and Start Time as well as anToDate and End Time. Once you have added those, click “Next.” - Next, you’ll be prompted to add a quick message for your team about why you’re seeking coverage. Once you’ve filled that out, click “Submit.”
- A Coverage Request will be created, and any member of your team can claim the time slot created.
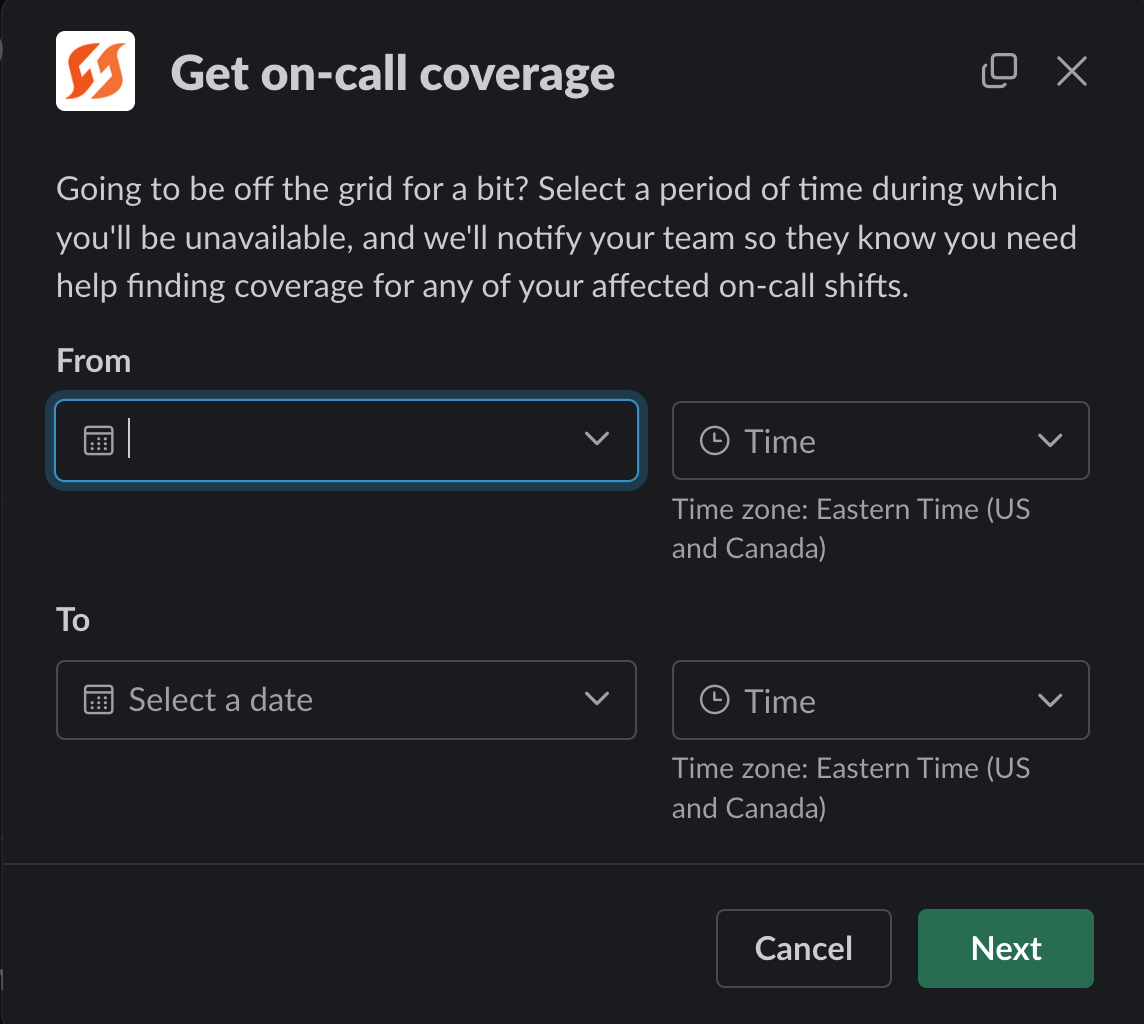
Getting on-call coverage in Slack
Canceling Coverage Requests
At any time, if you no longer need coverage for a shift or partial shift, you can directly cancel the coverage request from the web application or mobile application. Just click on the empty shift generated from the coverage request and click Cancel coverage request.
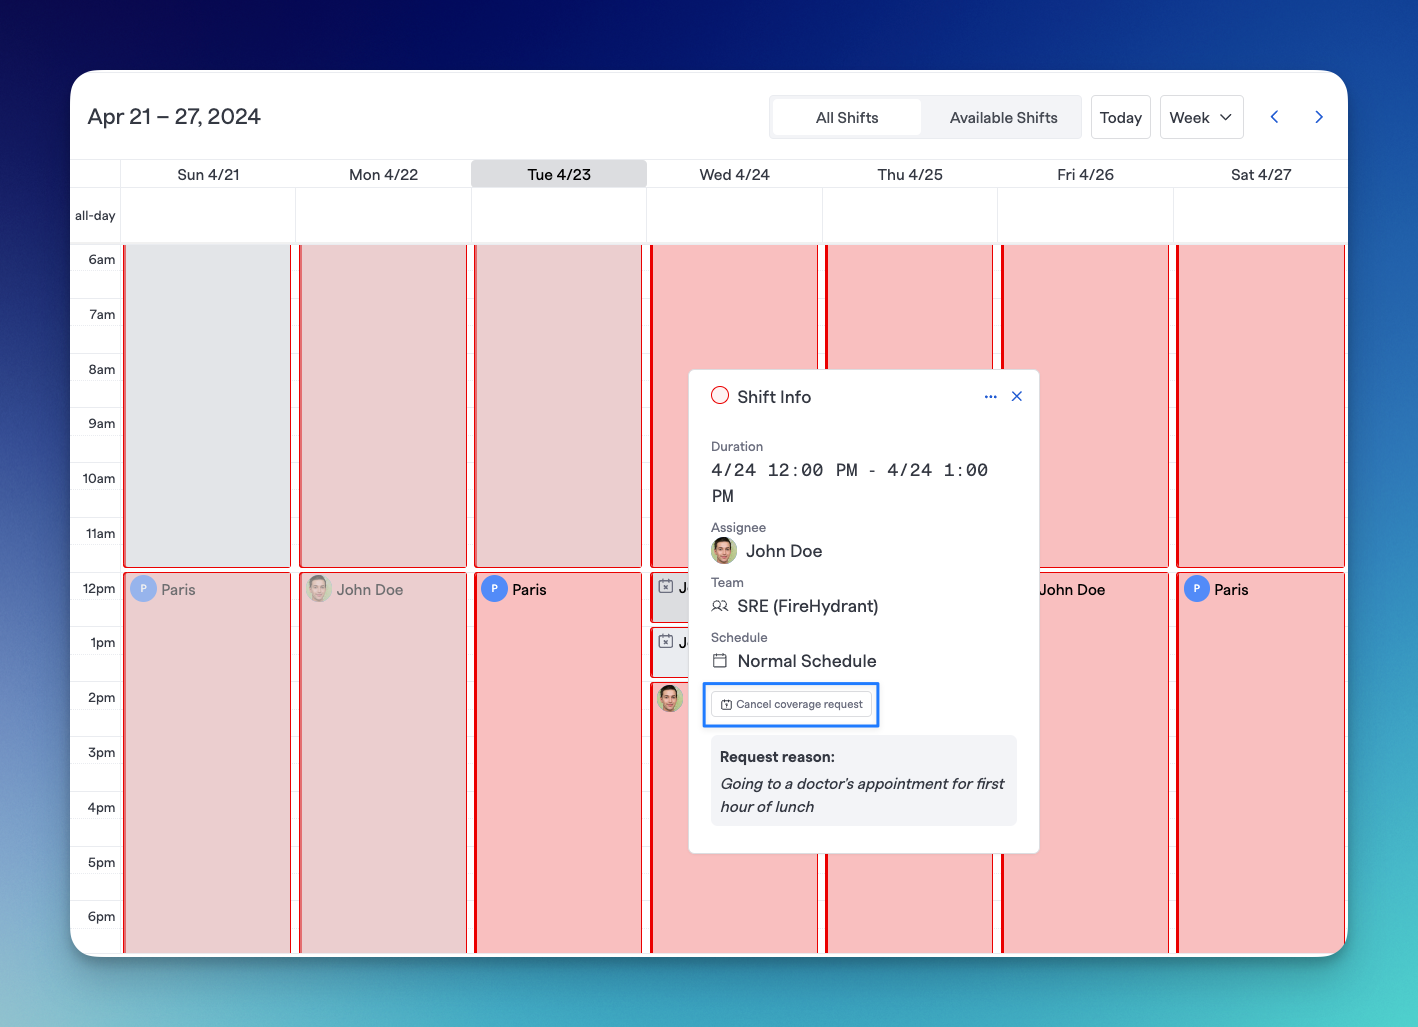
Canceling a coverage request from UI
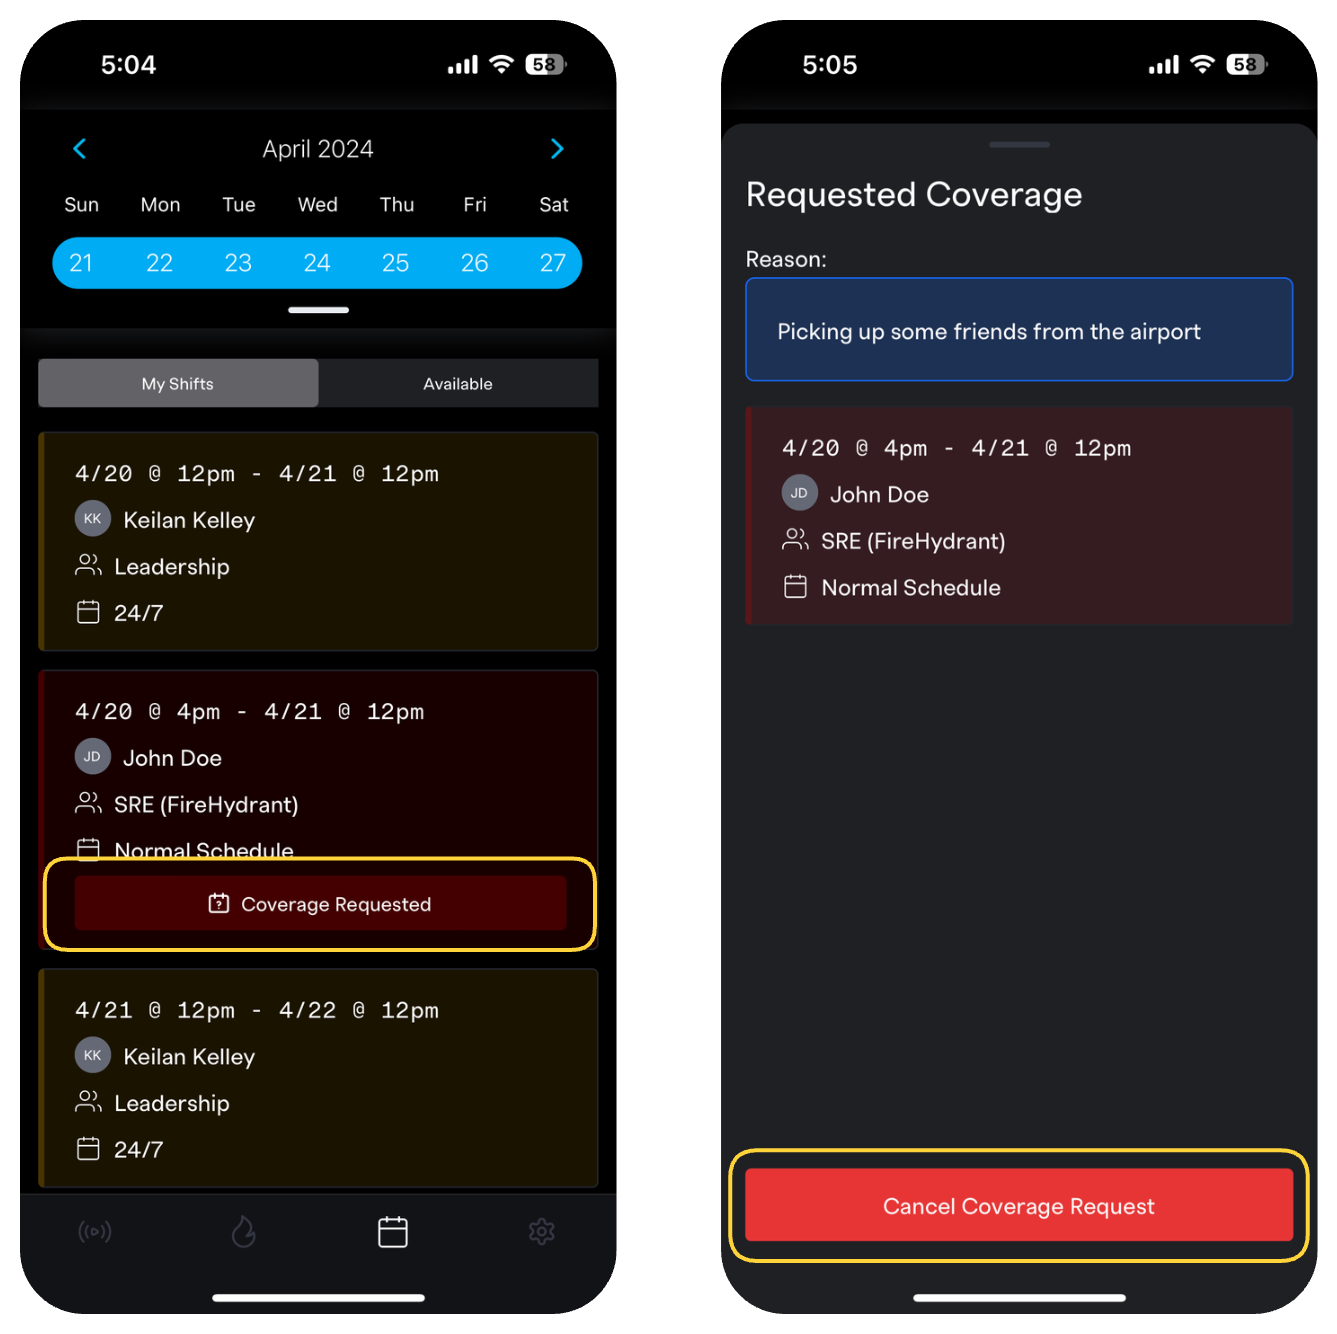
Canceling a coverage request from mobile app
Claiming Shifts
Any time a responder on your team requests coverage for their shift (or part of their shift), all team members will receive a notification via email and Slack. Users can claim the shift directly from that notification.
via Web App
- Navigate to the On Call Schedules page for your team. Alternatively, if you click the link from an email notification about someone requesting coverage, this will take you directly to this page.
- At the top of the calendar, toggle from "All Shifts" to "Available Shifts." For any available shift, you can "claim" that shift, and you will be assigned to it.
- That shift will appear in the “My Shifts” section on the dashboard.
via Slack
When a user requests coverage and their team has a linked Slack channel, FireHydrant will post a notification message to that team's channel and an action button to "Claim shift." This opens a modal confirming the claim and other pertinent details.
Once a shift has been claimed, an email will be sent to the team's members, and if a team Slack channel is configured, it will also post into the team's Slack channel. If not, the person who originally requested the coverage will receive a private message from FireHydrant in Slack notifying them their coverage request was handled.
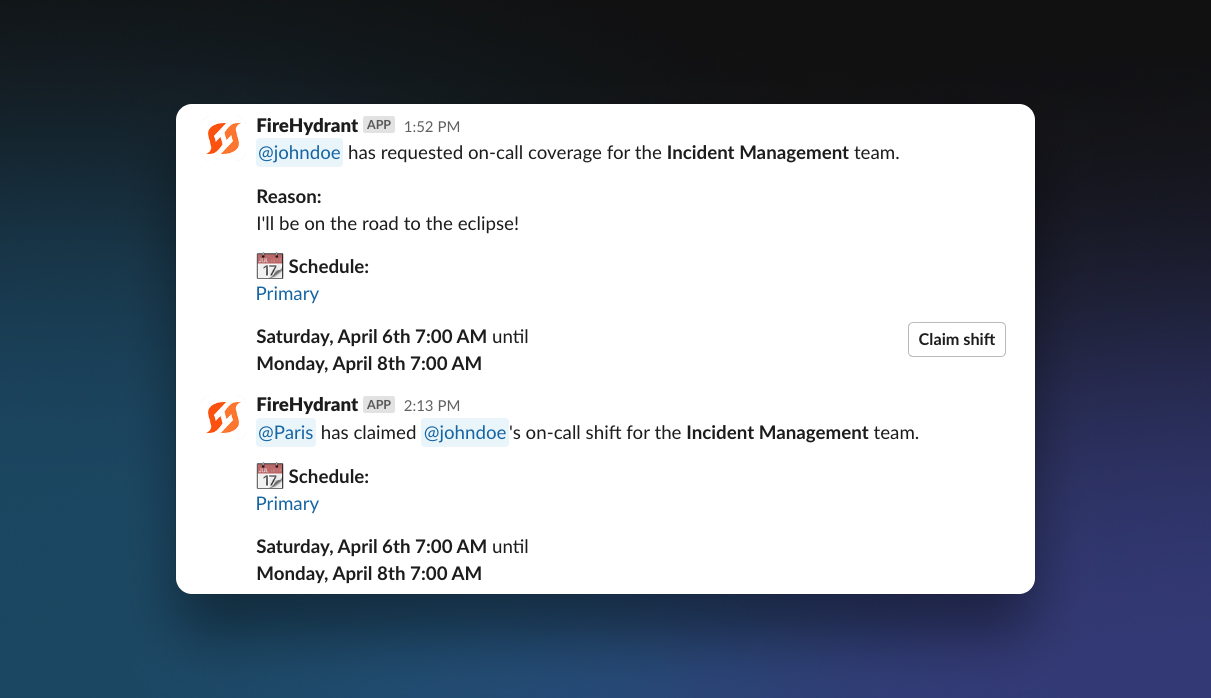
Example of requested + claimed shift notification messages in a team's Slack channel
Overrides
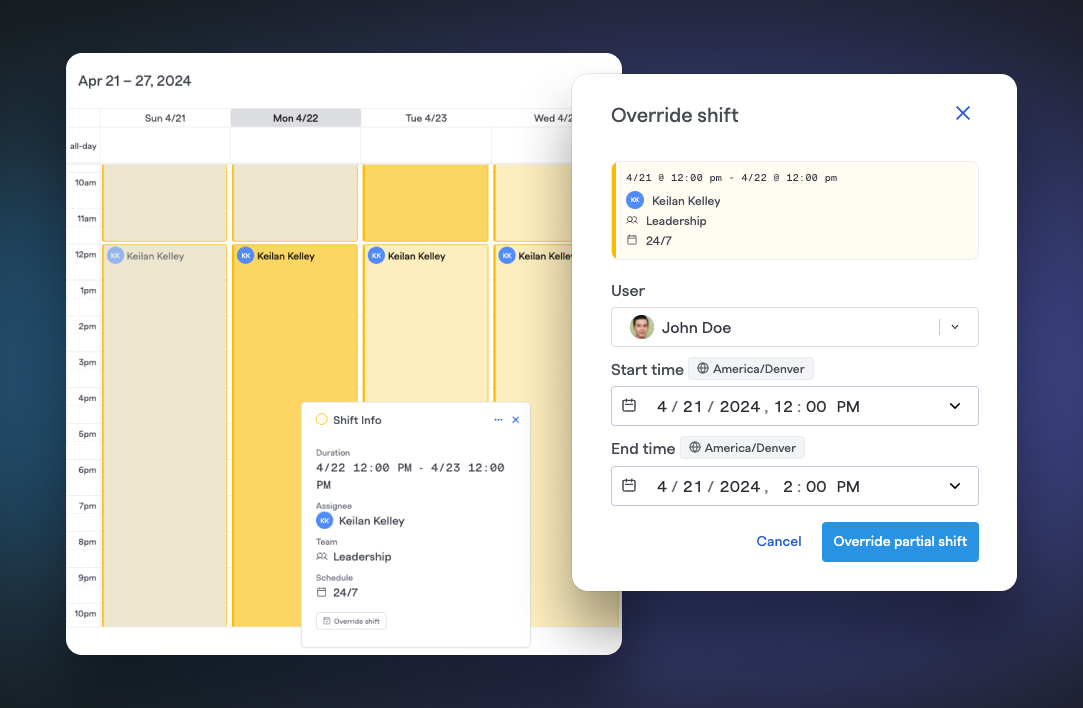
Overriding a full or partial shift
If you already know a shift or portion of a shift you'd like to claim from someone else, they do not need to submit a coverage request. You can go directly to their shift in the on-call schedules page, click on a shift, and then click Override shift.
This will open an additional modal where you can specify the start/end times of the overrides as well as who to assign to the shift. It will default to overriding the whole shift, so if you only want to claim a partial of the shift, change the date and time as needed.
Note:
Overriding a shift does not notify the team's Slack channel or the user who owned the shift pre-override.
Subscribing to On-Call Calendars
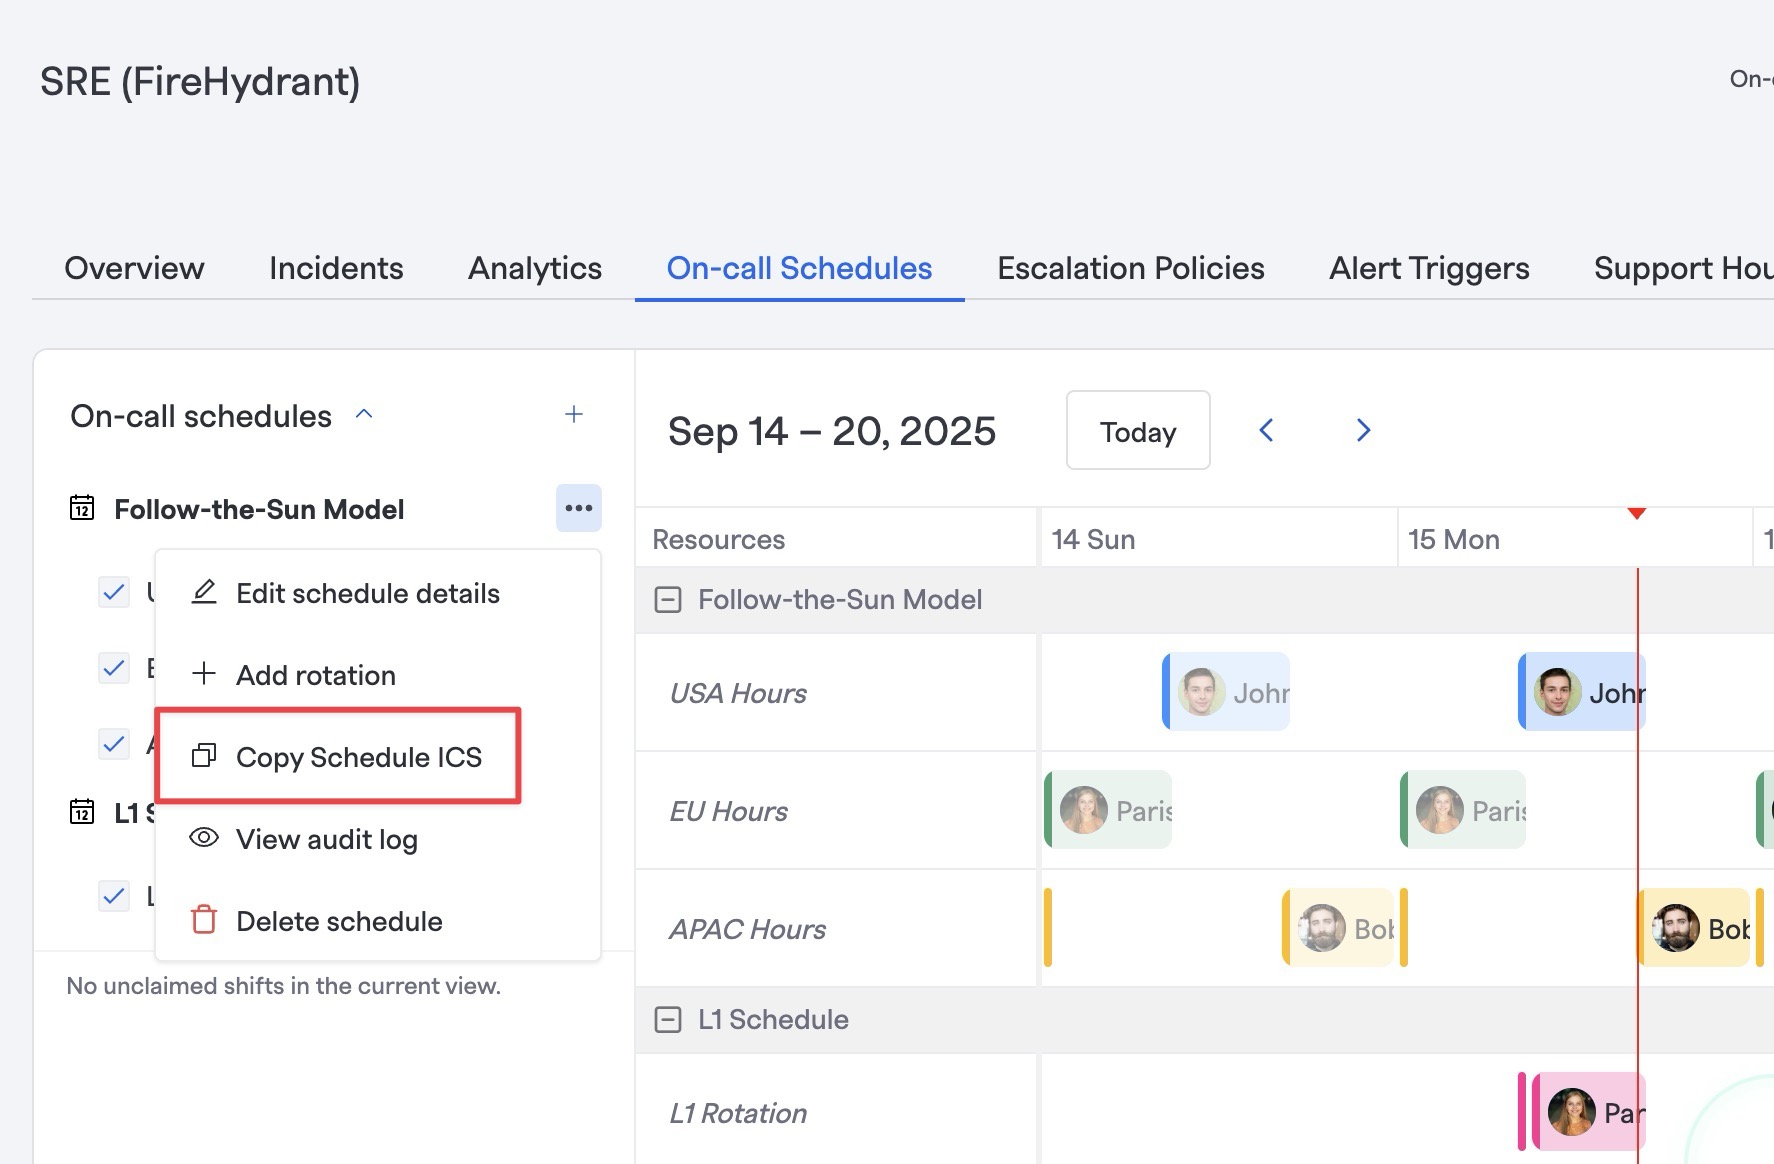
Calendar subscription links for team schedules and user shifts
You can subscribe to and view on-call schedules directly in your calendar application by copying the link provided in FireHydrant. There are two:
- In the On-call Schedules tab within a team, click the ellipses next to a specific schedule. In the dropdown, there is a "Copy ICS URL" button for calendar subscription link. This will subscribe to all on-call schedules within the Team.
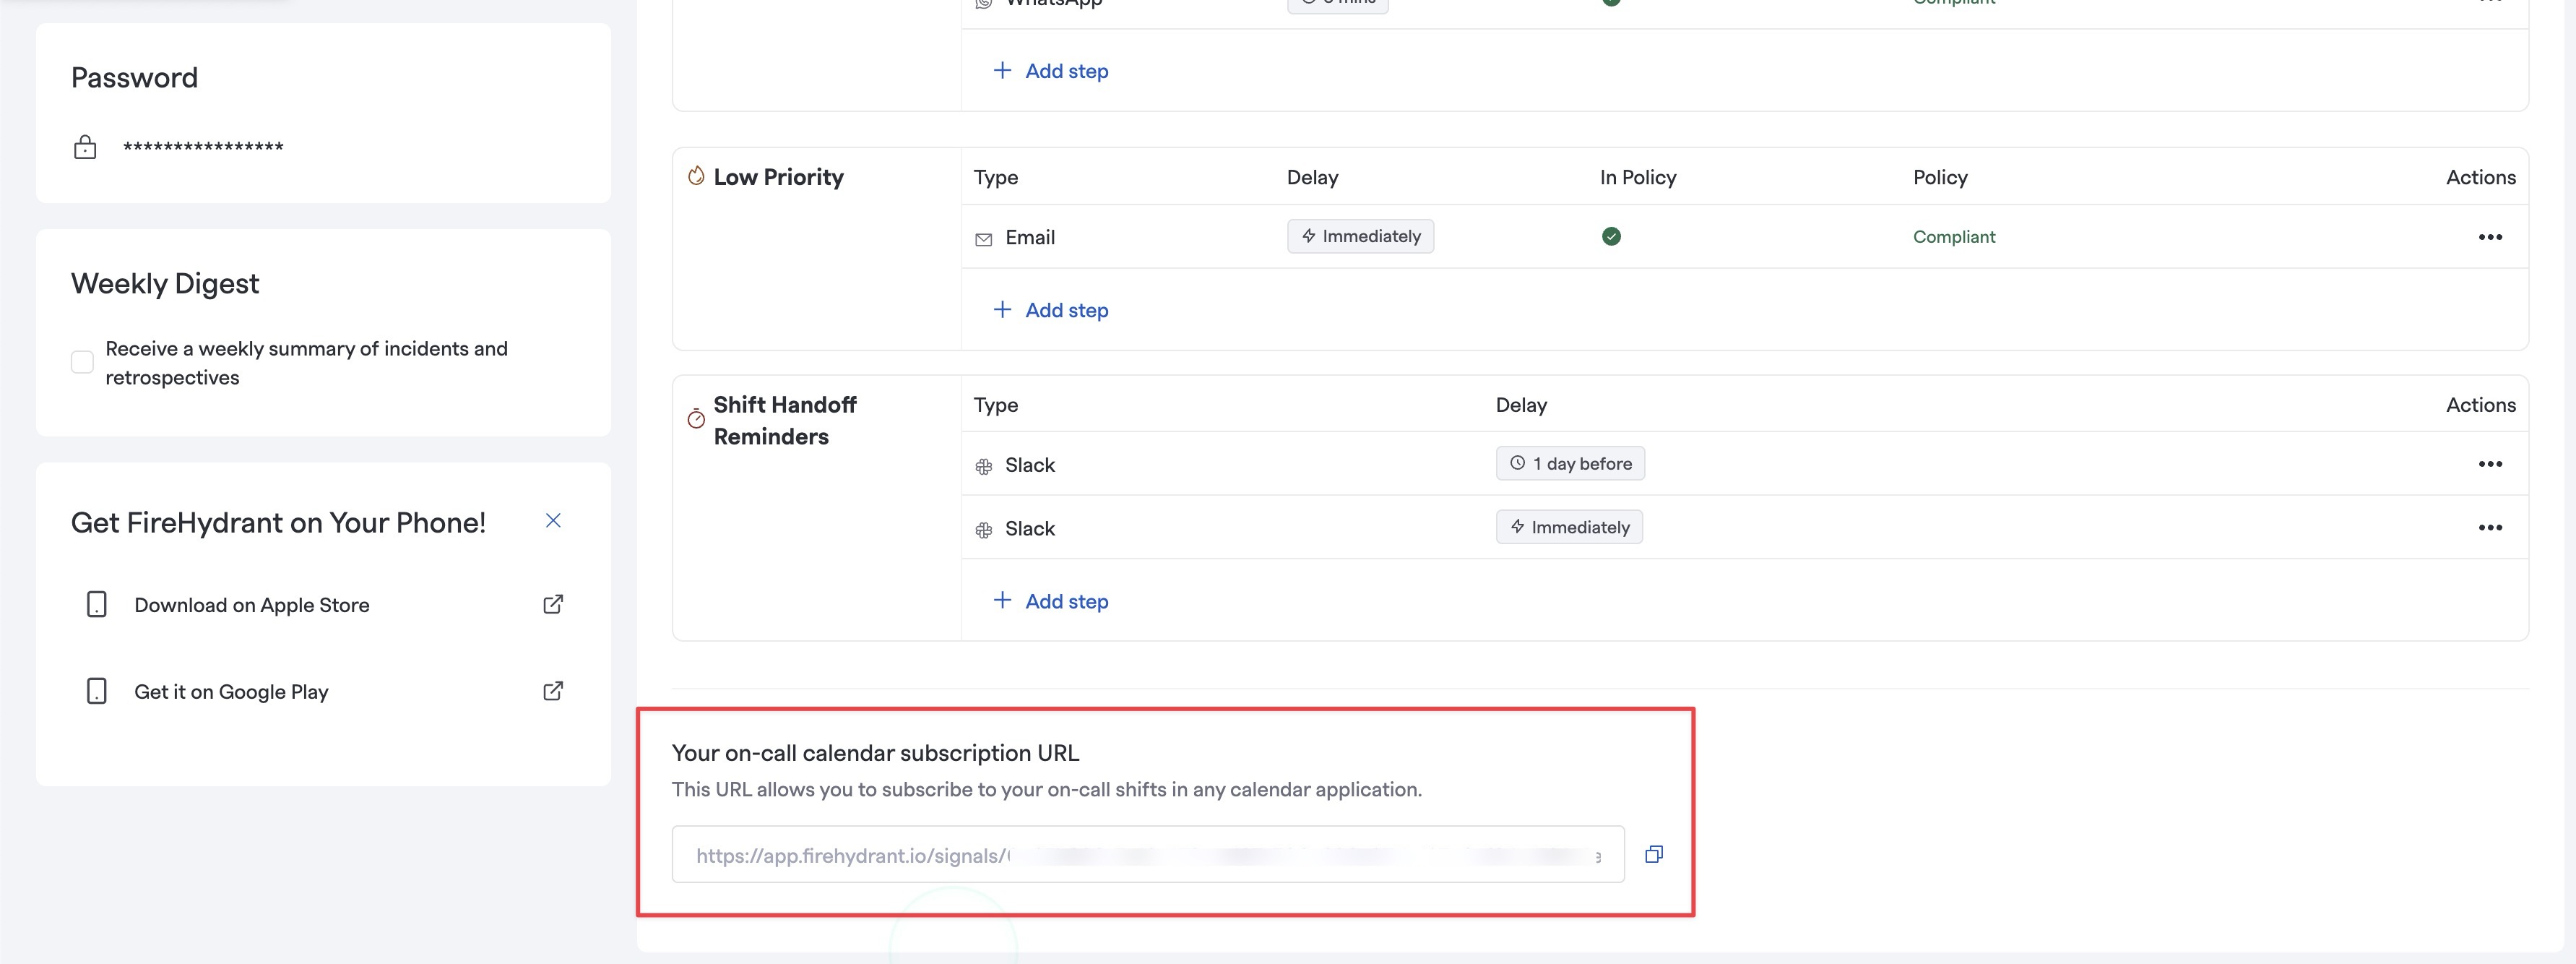
User profile settings > calendar subscription URL
- On the User's profile settings page in Notifications tab, the user can scroll down to the on-call calendar subscription URL. This calendar link will show all of that user's on-call shifts across all schedules.
Unassigned / Unclaimed Shifts
If a responder is removed/disabled in your organization while still included in a rotation, their future shift blocks may appear as Unassigned/Unclaimed and will not auto-backfill. To fix this, edit the rotation to remove the responder and regenerate future shifts (or delete/recreate the rotation). To prevent this, remove responders from rotations before deprovisioning them, then regenerate shifts to restore coverage.
Permissions
Users with Member permissions can configure and update any on-call schedules within any teams they are members of. Users with Owner permission can edit the same for all teams regardless of their membership or lack thereof.
For more information, visit Role-Based Access Controls.
Next Steps
- Configure Signals Shift Notifications - You can configure Slack channels to associate them with teams and to print notes or updates whenever a shift change occurs
- Escalation Policies - Set up an escalation policy for your on-call schedule(s) to decide in what order FireHydrant should attempt to alert responders
- Notification Preferences - Individual users will need to set up their notification preferences to ensure they receive alerts when on-call
Updated 8 days ago
