Intro to Runbooks
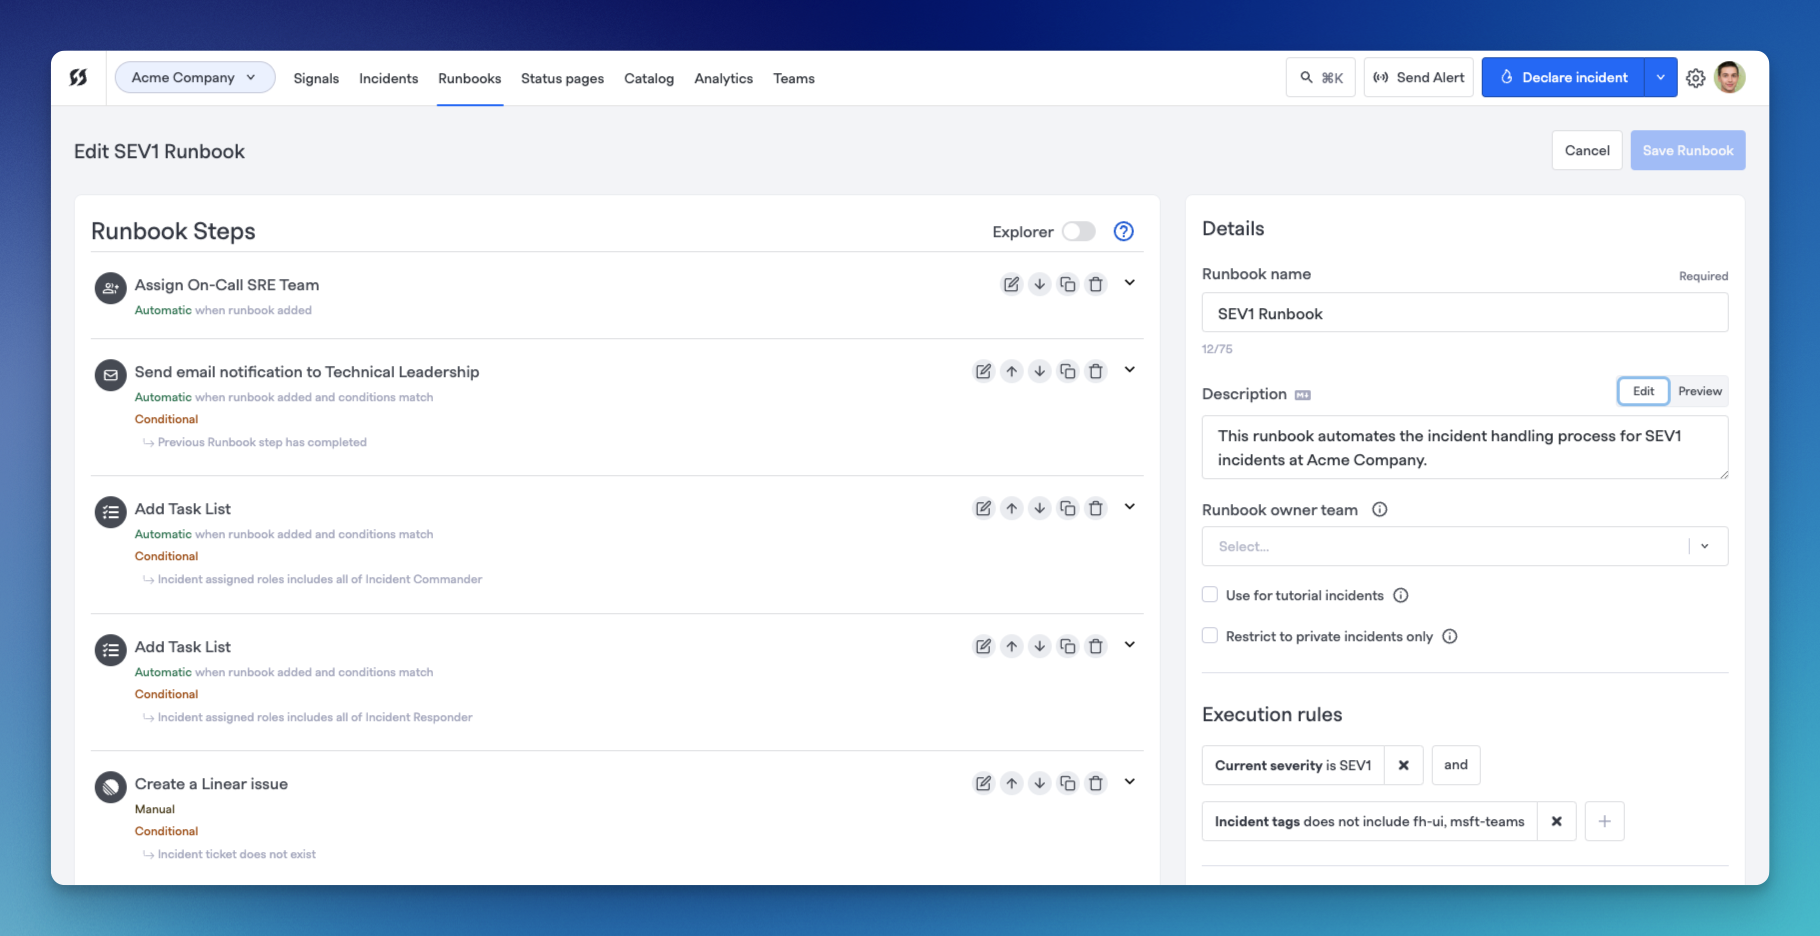
Example of a Runbook and steps within
What is a Runbook?
Runbooks are FireHydrant's automation engine. They define and automate a workflow of steps and actions according to specified conditions.
Runbooks consist of steps, which are individual actions or units of automation. Some examples of actions include creating a Slack channel, starting a Zoom meeting, or creating a Jira ticket, among many more.
The automation Runbooks provide reduces toil and allows responders to focus immediately on resolving the incident.
Default Runbook
When you first sign up for an account, FireHydrant builds a Default Runbook for you that always attaches to every incident. It comes with a couple default steps and dynamically inserts more based on the integrations you install.
- The default Runbook will always have two default steps:
- Assign a Role: Assigns whoever opened the incident to the Commander role.
- Add Task List: Assigns a default Task List to whoever is the Commander.
- If you install the Slack integration, FireHydrant automatically inserts the following steps:
- Create or Rename Incident Channel: Creates an incident channel linked to the incident.
- Archive Incident Channel: Automatically archives the incident channel. The default condition is "When milestone = Retrospective Completed".
- If you install either Google Meet or Zoom, FireHydrant will insert one of the following steps:
The default Runbook is an introduction to and basic example of Runbooks. Organizations are able and encouraged to make any modifications and build additional Runbooks beyond the Default.
Managing Runbooks
Creating a Runbook
To create a new Incident Runbook:
-
Go to the Runbooks page and click "+ Add runbook."
-
Fill out a name and description to make this Runbook discoverable in the future. If you want this Runbook to only attach to certain incidents, you can specify Runbook conditions.
-
In the steps section, click "+ Add Step." In this modal, you can search for all available Runbook steps to add to the incident. More steps become available as more integrations are added. See Integrations Overview for an overview of all the available integrations.
-
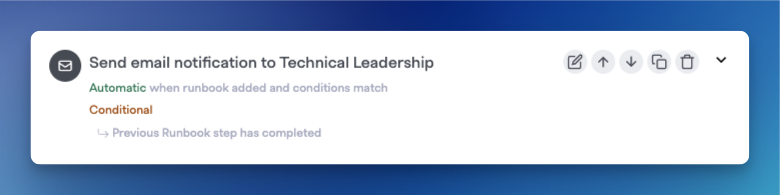
Once you click on a step, you are presented with configuration options that will be different depending on the step. The Details tab shows specific details you can configure for this step, and the Conditions & scheduling tab allows you to specify execution conditions for the step. When you are finished, click "Add step" button.
-
In addition to adding steps, you can perform actions on existing steps in the Runbook, including editing the step, moving it up and down on the list**, duplicating, and deleting it.
-
Repeat steps #3 - #5 above until you've configured the Runbook to your liking. Then click "Save Runbook" on the top right.
**Note:Runbooks are designed for each step to execute immediately and concurrently; this means Runbook steps won't always execute in order (as they appear in the FireHydrant UI).
To add Runbook steps that won't be executed until after another specific step, you can add that limitation by using Runbook conditions.
Editing a Runbook
To edit a Runbook, navigate to your Runbooks page and then click on the Runbook you want to edit. In this page, click on "Edit Runbook". This screen will be the same screen you saw in Creating a Runbook you saw above.
Duplicating a Runbook
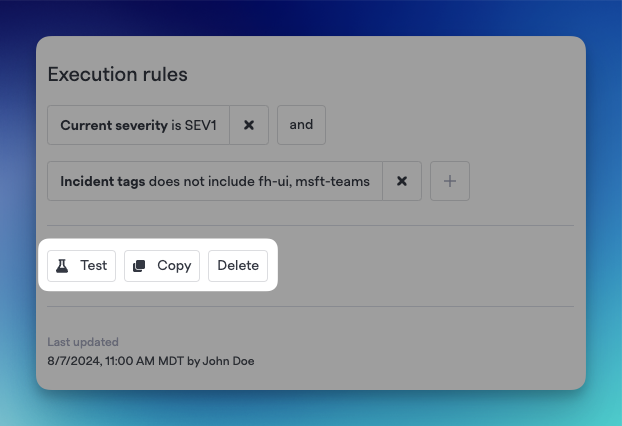
Action buttons in a Runbook, just below Execution Rules in the Details panel
You can create copies of any existing Runbook by entering the Runbook's details and clicking Copy on the bottom right in the details panel. This clones the Runbook's steps to a New Runbook screen, allowing you to begin editing from what's existing and creating a new Runbook.
Deleting a Runbook
Similar to duplicating a Runbook, you can delete a Runbook by going into the Runbook's details and clicking Delete at the bottom right in the details panel.
Runbook Ownership
You can lock down Runbooks so that only users from a specific team can edit them. By default, Runbooks do not have Owners, and subsequently, Runbooks are editable by anyone in your organization who has Owner or Member permissions.
Note:Once you set the Owning Team on a Runbook and save, permissions changes immediately take effect. So if you are not a member of the Owning Team that is set, you will immediately lose Edit access to that Runbook.
Runbook Execution
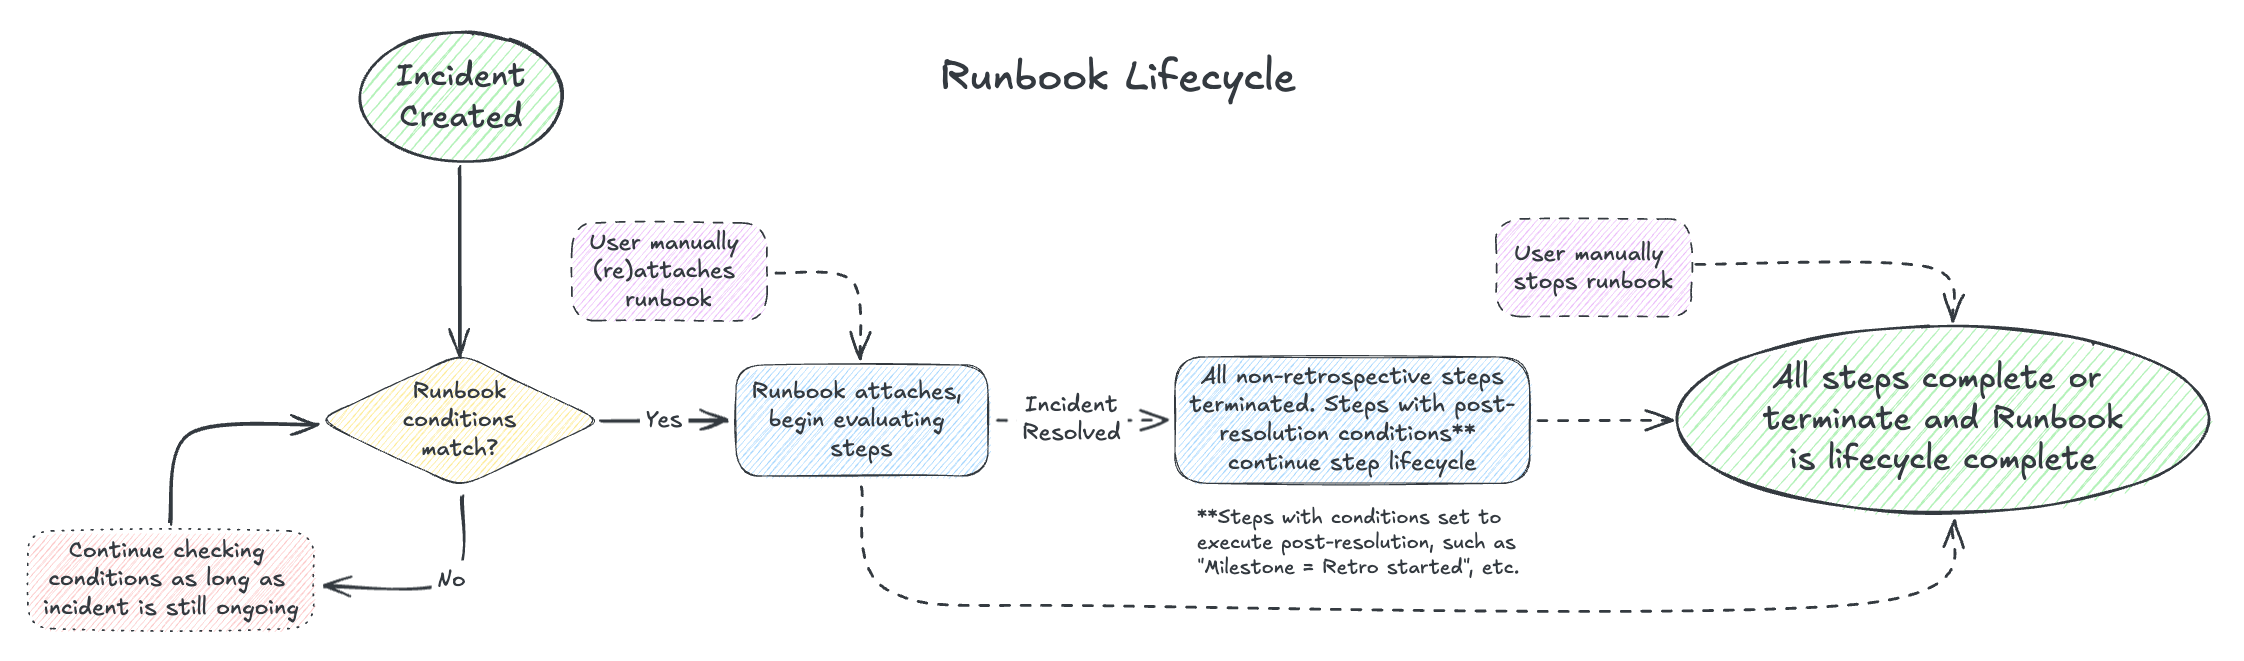
Visual overview of Runbook execution lifecycle
At any time, all of your incidents are constantly evaluating your Runbooks' conditions. This means Runbooks can attach at any time throughout an incident's lifecycle as soon as conditions match or when manually attached.
When attaching a Runbook, FireHydrant uses the snapshot of the defined Runbook and its steps at that given moment, so any changes to Runbook steps and definitions after a Runbook has been attached to incidents will not be reflected on said incidents, only future attachments.
Automatic Attachment
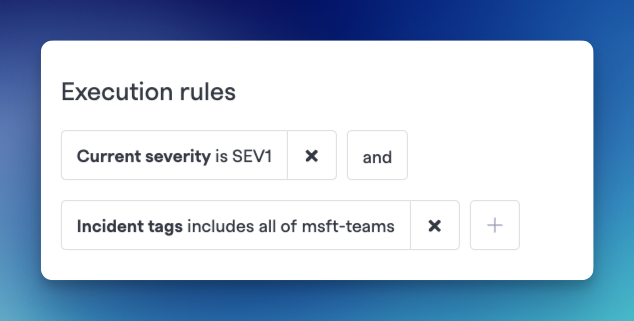
Example Runbook conditions
You can configure Runbooks to automatically attach based on your defined conditions and triggers. To learn more, visit Runbook Conditions.
Manual Attachment
Attaching Runbook via Command Center and Microsoft Teams Tab
Attach from Slack with /fh runbooks
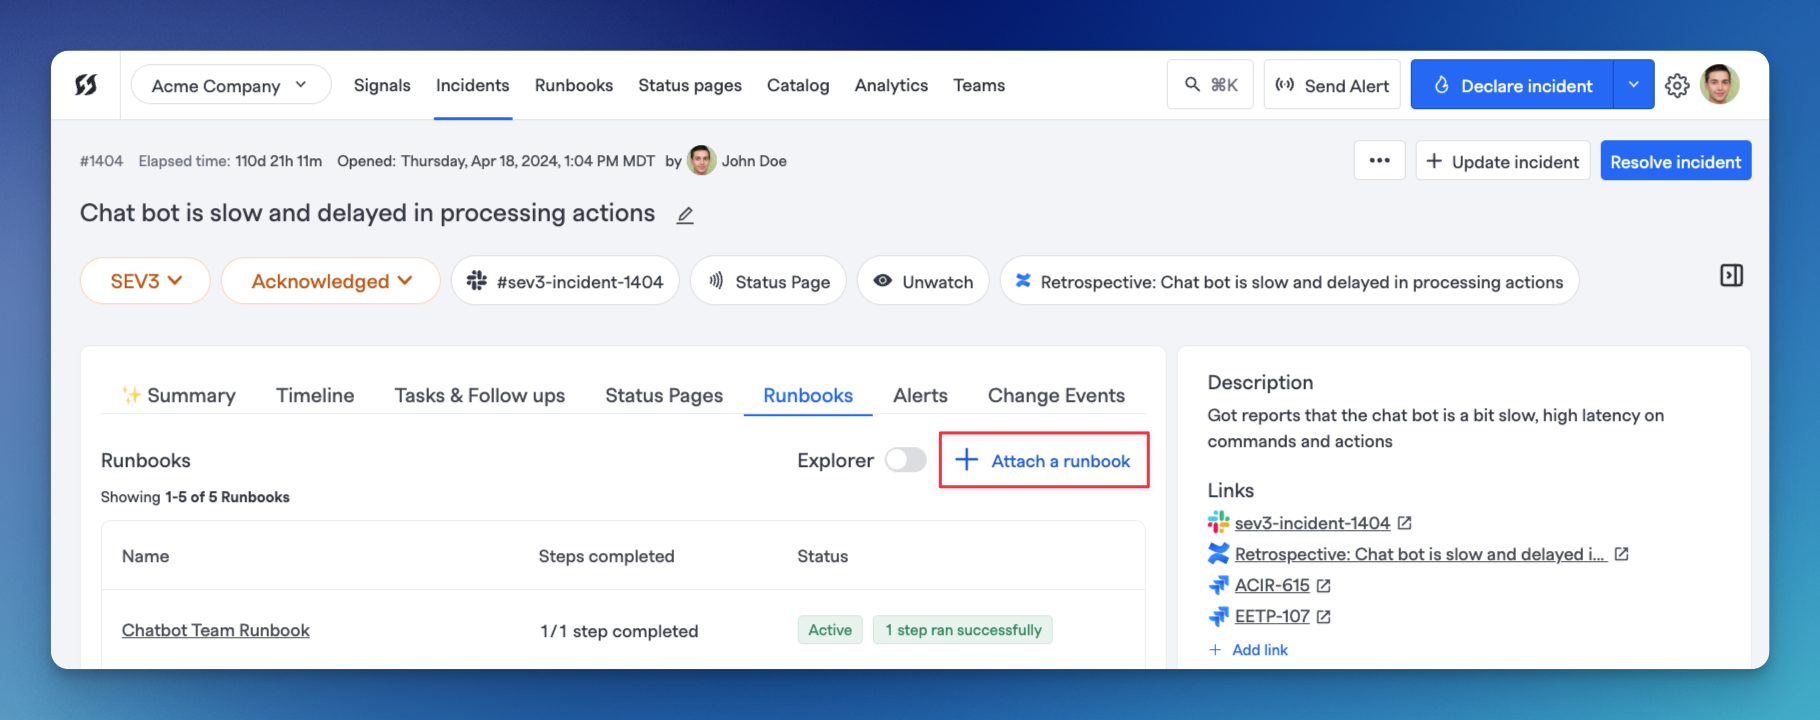
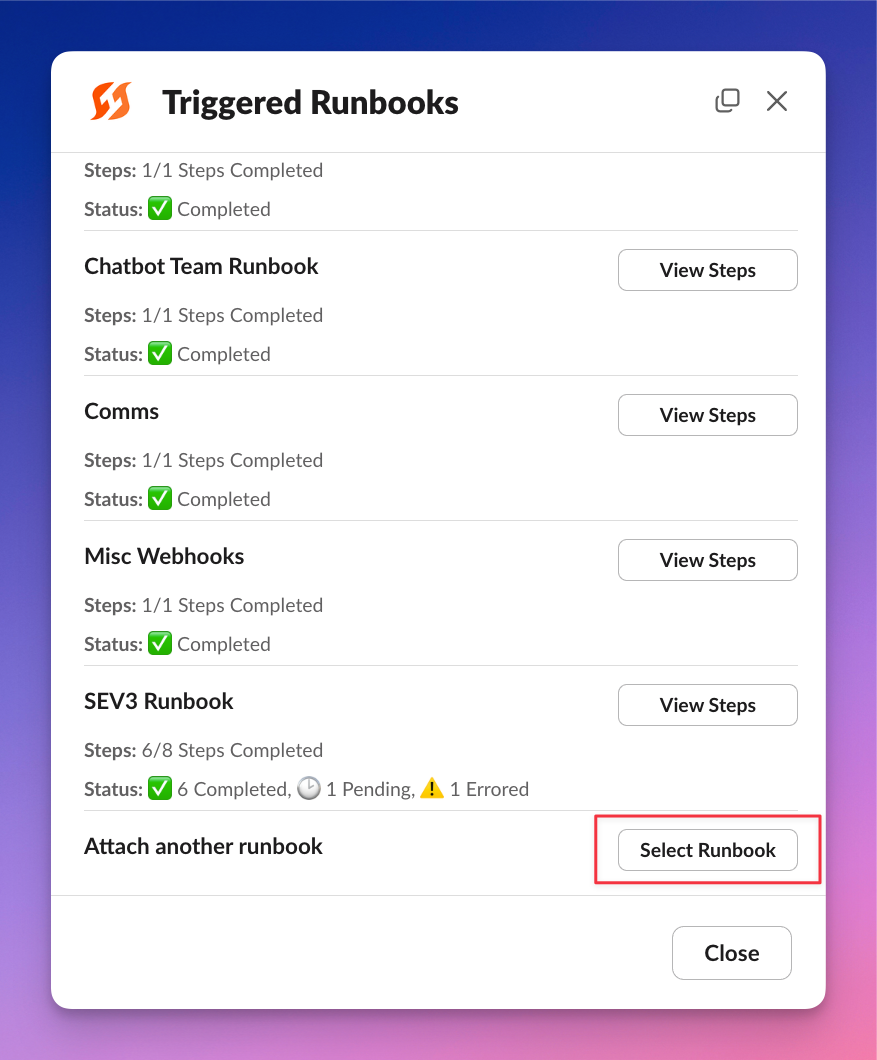
You can manually attach Runbooks to execute them by visiting the Runbooks tab and clicking + Attach a Runbook when using the web UI and Microsoft Teams Tab in the incident channel. In Slack, you can run /fh runbooks to pull up the Runbooks modal.
Manually attaching a new Runbook will immediately process the steps within and their conditions.
Stopping and Rerunning

Stop and Run again buttons when viewing a Runbook on an incident
After a Runbook has been attached, you can view it directly in the Command Center by visiting the Runbooks tab and clicking on the specific Runbook. Within, you'll also see buttons to Stop runbook and Run again, which will halt all steps in the Runbook and then re-execute and re-evaluate them, respectively.
Note:When stopping and re-running a Runbook, it will re-execute the steps as-attached and will not include any changes made to the Runbook post-attachment.
Step Execution
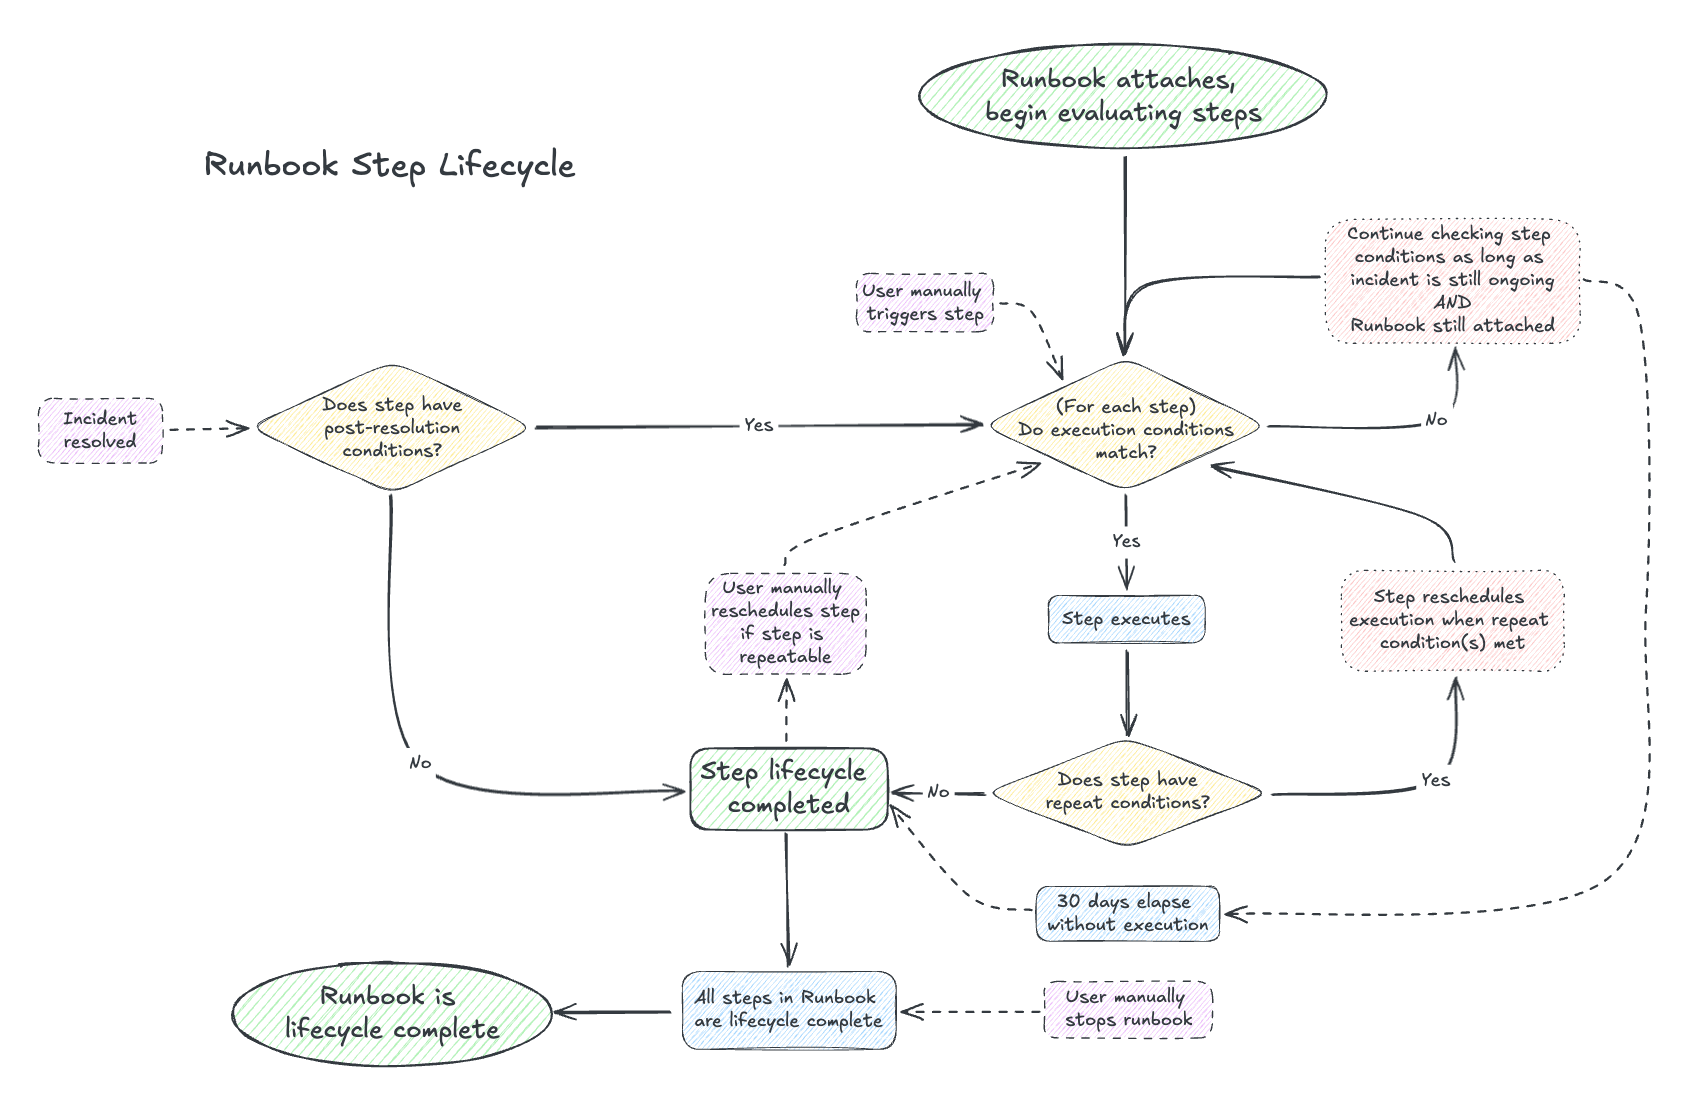
Visual overview of Runbook Step execution lifecycle
A Runbook's steps will begin evaluation and execution when the Runbook itself has attached. Just like Runbooks, individual Runbook steps can automatically execute, execute based on conditions, or be manually triggered.
Some steps are repeatable, while other steps can only be executed once. Repeatable steps can be rerun so long as the Runbook has not completed its lifecycle. 90 days after a step is scheduled, if it still has not completed, it will terminate automatically.
Runbook Reconciliation: FireHydrant periodically reconciles Runbook rules by evaluating conditions against past incidents (up to 90 days old) to determine if rules should have attached. This ensures your automation stays up-to-date as your incident patterns evolve and your Runbook conditions change.
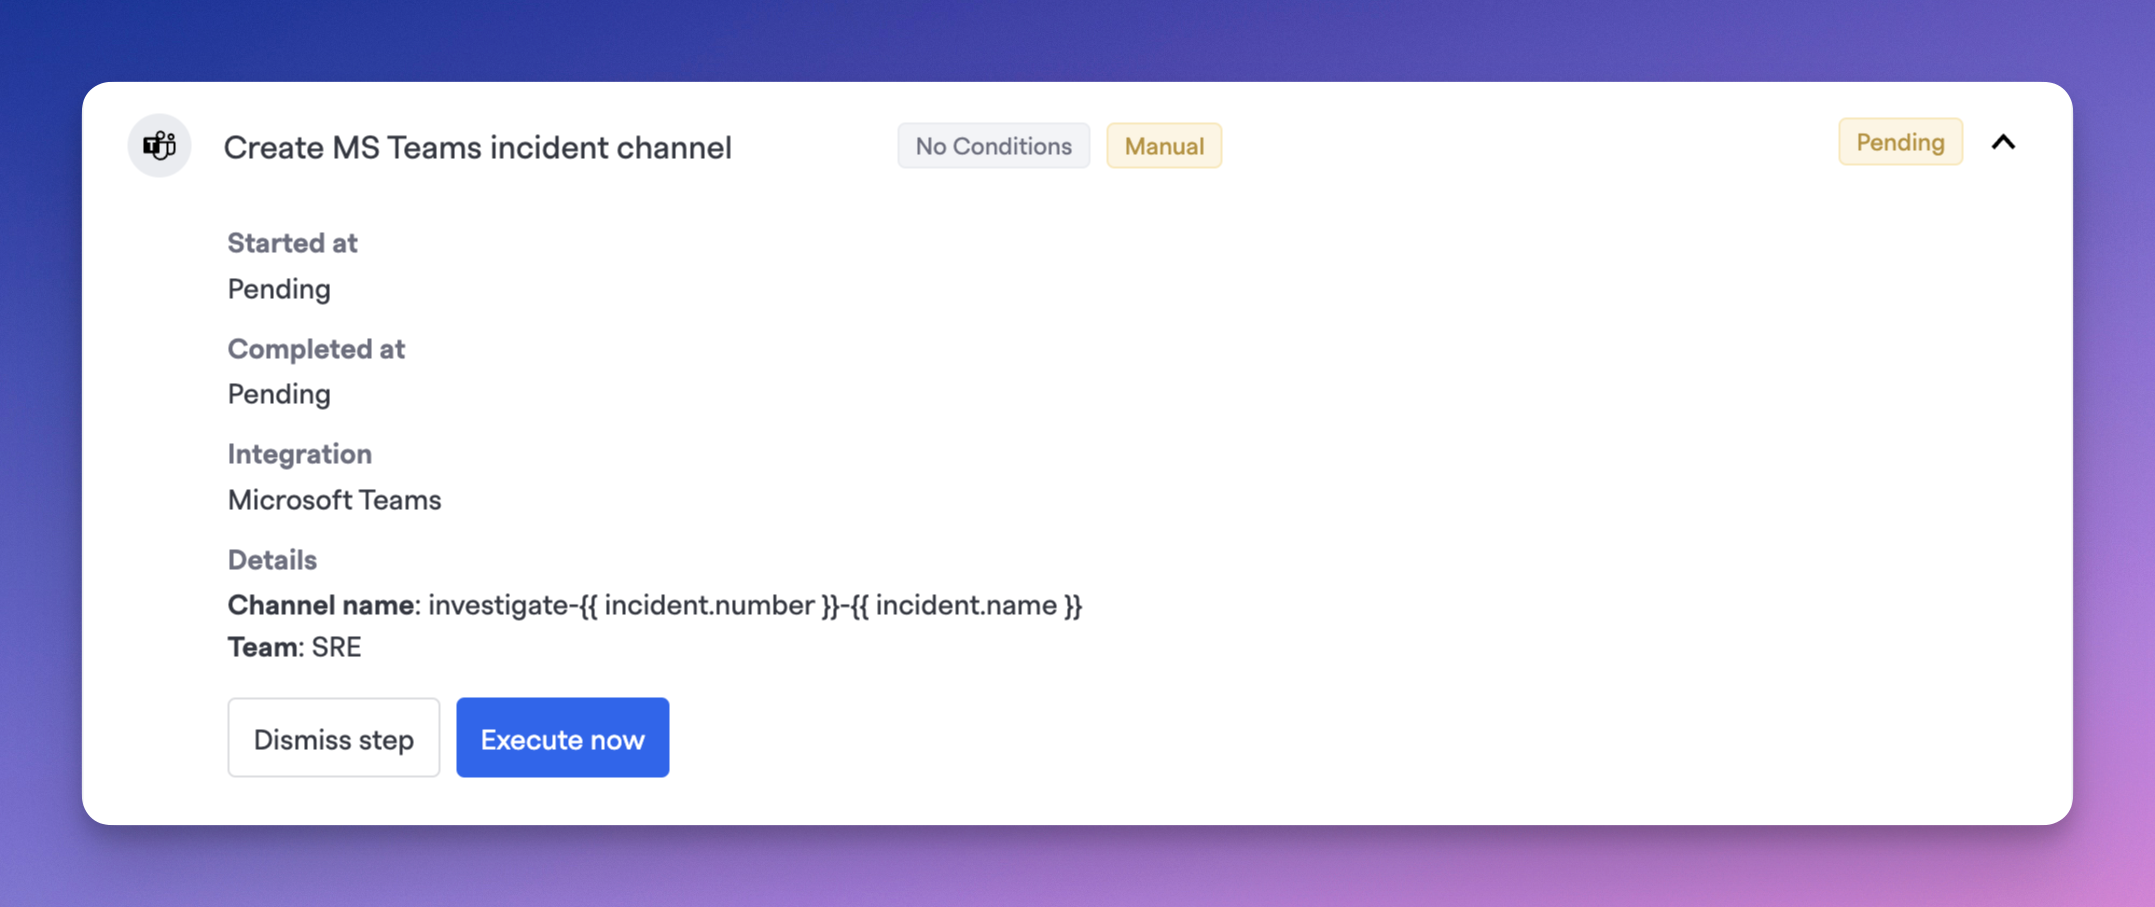
Example of taking manual actions on a Runbook step
Just like with Runbooks, individual steps can be triggered, retried, or stopped within the Command Center's Runbooks page.
Visual Explorer
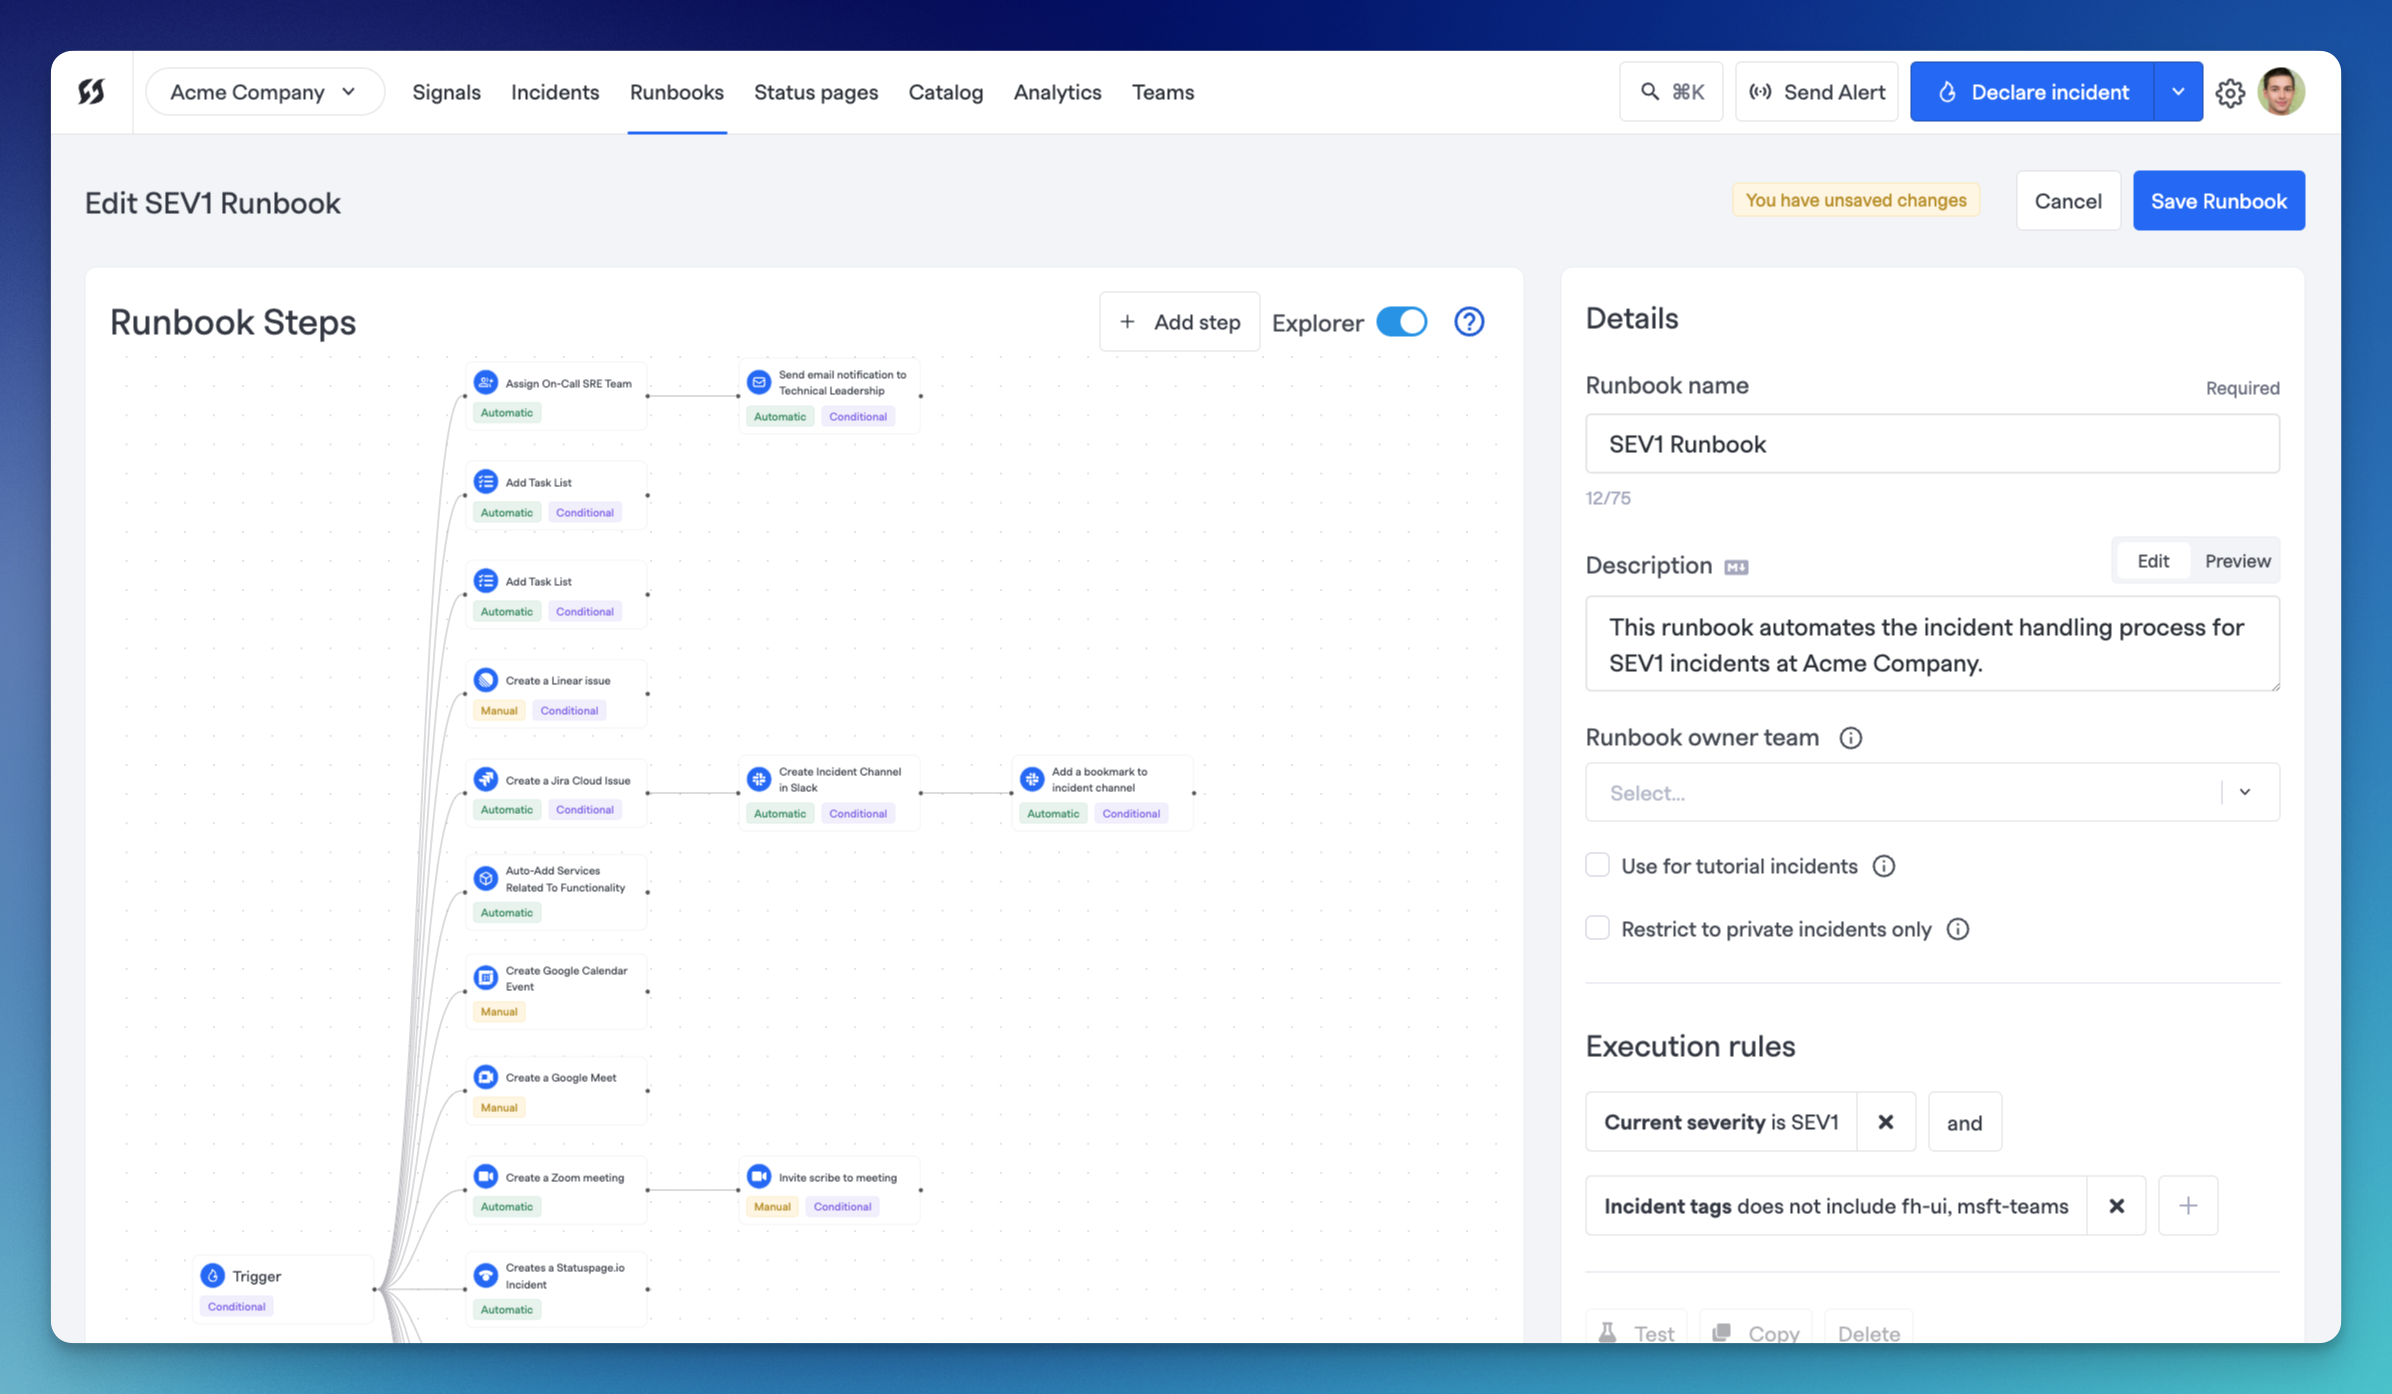
Runbook Visual Explorer
Within each Runbook and when browsing a Runbook's execution status in The Command Center, there is a Visual Runbook Explorer. This can help you visually see which steps depend on which other steps, and what has already executed vs. not.
To view the explorer, toggle the switch at the top next to Explorer.
Next Steps
- Learn how to use Runbooks further by understanding conditions.
- Read about Runbook Best Practices and see some suggested Runbook recipes.
- Set up some basic conditions in your Runbooks and test them out. Then, tailor the Runbooks for different situations (e.g.,
SEV1vs.SEV2) or for different teams and impacted components. - Browse the Runbook Steps that are available, or check out our Integrations Overview to learn more about all of our integrations. Configuring more integrations will unlock more Runbook steps.
Updated 3 months ago