Incident Milestones & Lifecycle Phases
Incident milestones describe the current status of the incident and communicate to stakeholders the team's progress in resolving the issue.
As responders work through incidents on FireHydrant, they will typically transition the Milestone, and FireHydrant automatically logs the timestamps of these changes. This allows FireHydrant to collect data for holistic incident metrics out-of-the-box like MTT*, Impacted Infrastructure, Responder Impact, and so on.
Lifecycle Phases and Default Milestones
Milestones are grouped by lifecycle phases. We've defined four primary phases to cover the entire incident lifecycle, and each phase comes with several default milestones.
To learn more about customizing milestones, visit Custom Milestones.
Phase 1: Started
Indicates the starting stages of an incident where alerts are just coming in. This phase has the following default milestones:
-
Started - When the affected system began having problems.
-
Detected - When a monitoring system (or human) noticed that the system was having problems.
All milestones in this first phase will default to the time the FireHydrant incident was opened. It is common practice to update the Started milestone to an earlier timestamp if it is discovered that actual impact began earlier than when the FireHydrant incident was opened.
Note:Milestones generally don't have to be in chronological order, with one exception: Started milestone must be earlier than all other milestones since it is used to calculate respective MTTx metrics.
Phase 2: Active
Indicates that the incident is active (e.g., responders are working on fixing things). By default it will be populated with the following milestones:
- Acknowledged - When someone responding to the incident acknowledged the situation.
- Investigating - When the first concrete step toward triaging and identifying the problem was taken.
- Identified - When the problem was identified and corrective actions began.
- Mitigated - When the system is no longer exhibiting problems to users, but the team is still monitoring the situation. For example, the team may be waiting to see if signals or SLIs normalize after the corrective action.
If you manually open a FireHydrant incident, the incident begins with in the Active Lifecycle phase, and the timestamps for all milestones in the Started phase will match it. If the FireHydrant incident was initiated automatically (e.g., via API or Alert Routing), you will need to manually transition to an Active Lifecycle Phase.
All milestones beyond the first one in this Active phase must be manually transitioned to.
Phase 3: Post-incident
Indicates that mitigation is complete and the incident itself is no longer active. By default it will be populated with the following milestones:
- Resolved - When the system is confirmed to be working again with no relapse. This is also the time when temporary fixes to mitigate the issue are removed, and the system is now behaving as normal.
- Retrospective Started - When the team has actively begun to review the incident.
- Retrospective Completed - When the team has finished reviewing the incident, clarified learnings and follow-ups, and published findings.
All milestones in this phase must be manually transitioned to by a user.
Phase 4: Closed
Indicates that the incident’s process has been fully completed and no further work will commence. By default it will be populated with the following milestone:
- Closed - Indicates all tasks mid- and post-incident are completed.
- This is not yet factored into any analytics and only shows up when editing Milestone timestamps during the Retrospective phases.
This milestone must be manually transitioned to by a user.
Updating Milestone Times
When you transition a Milestone, the timestamp at which you performed the action is filled in. However, you can change these values at any point.
You can change the values by clicking the Milestone dropdown in an incident's Command Center:
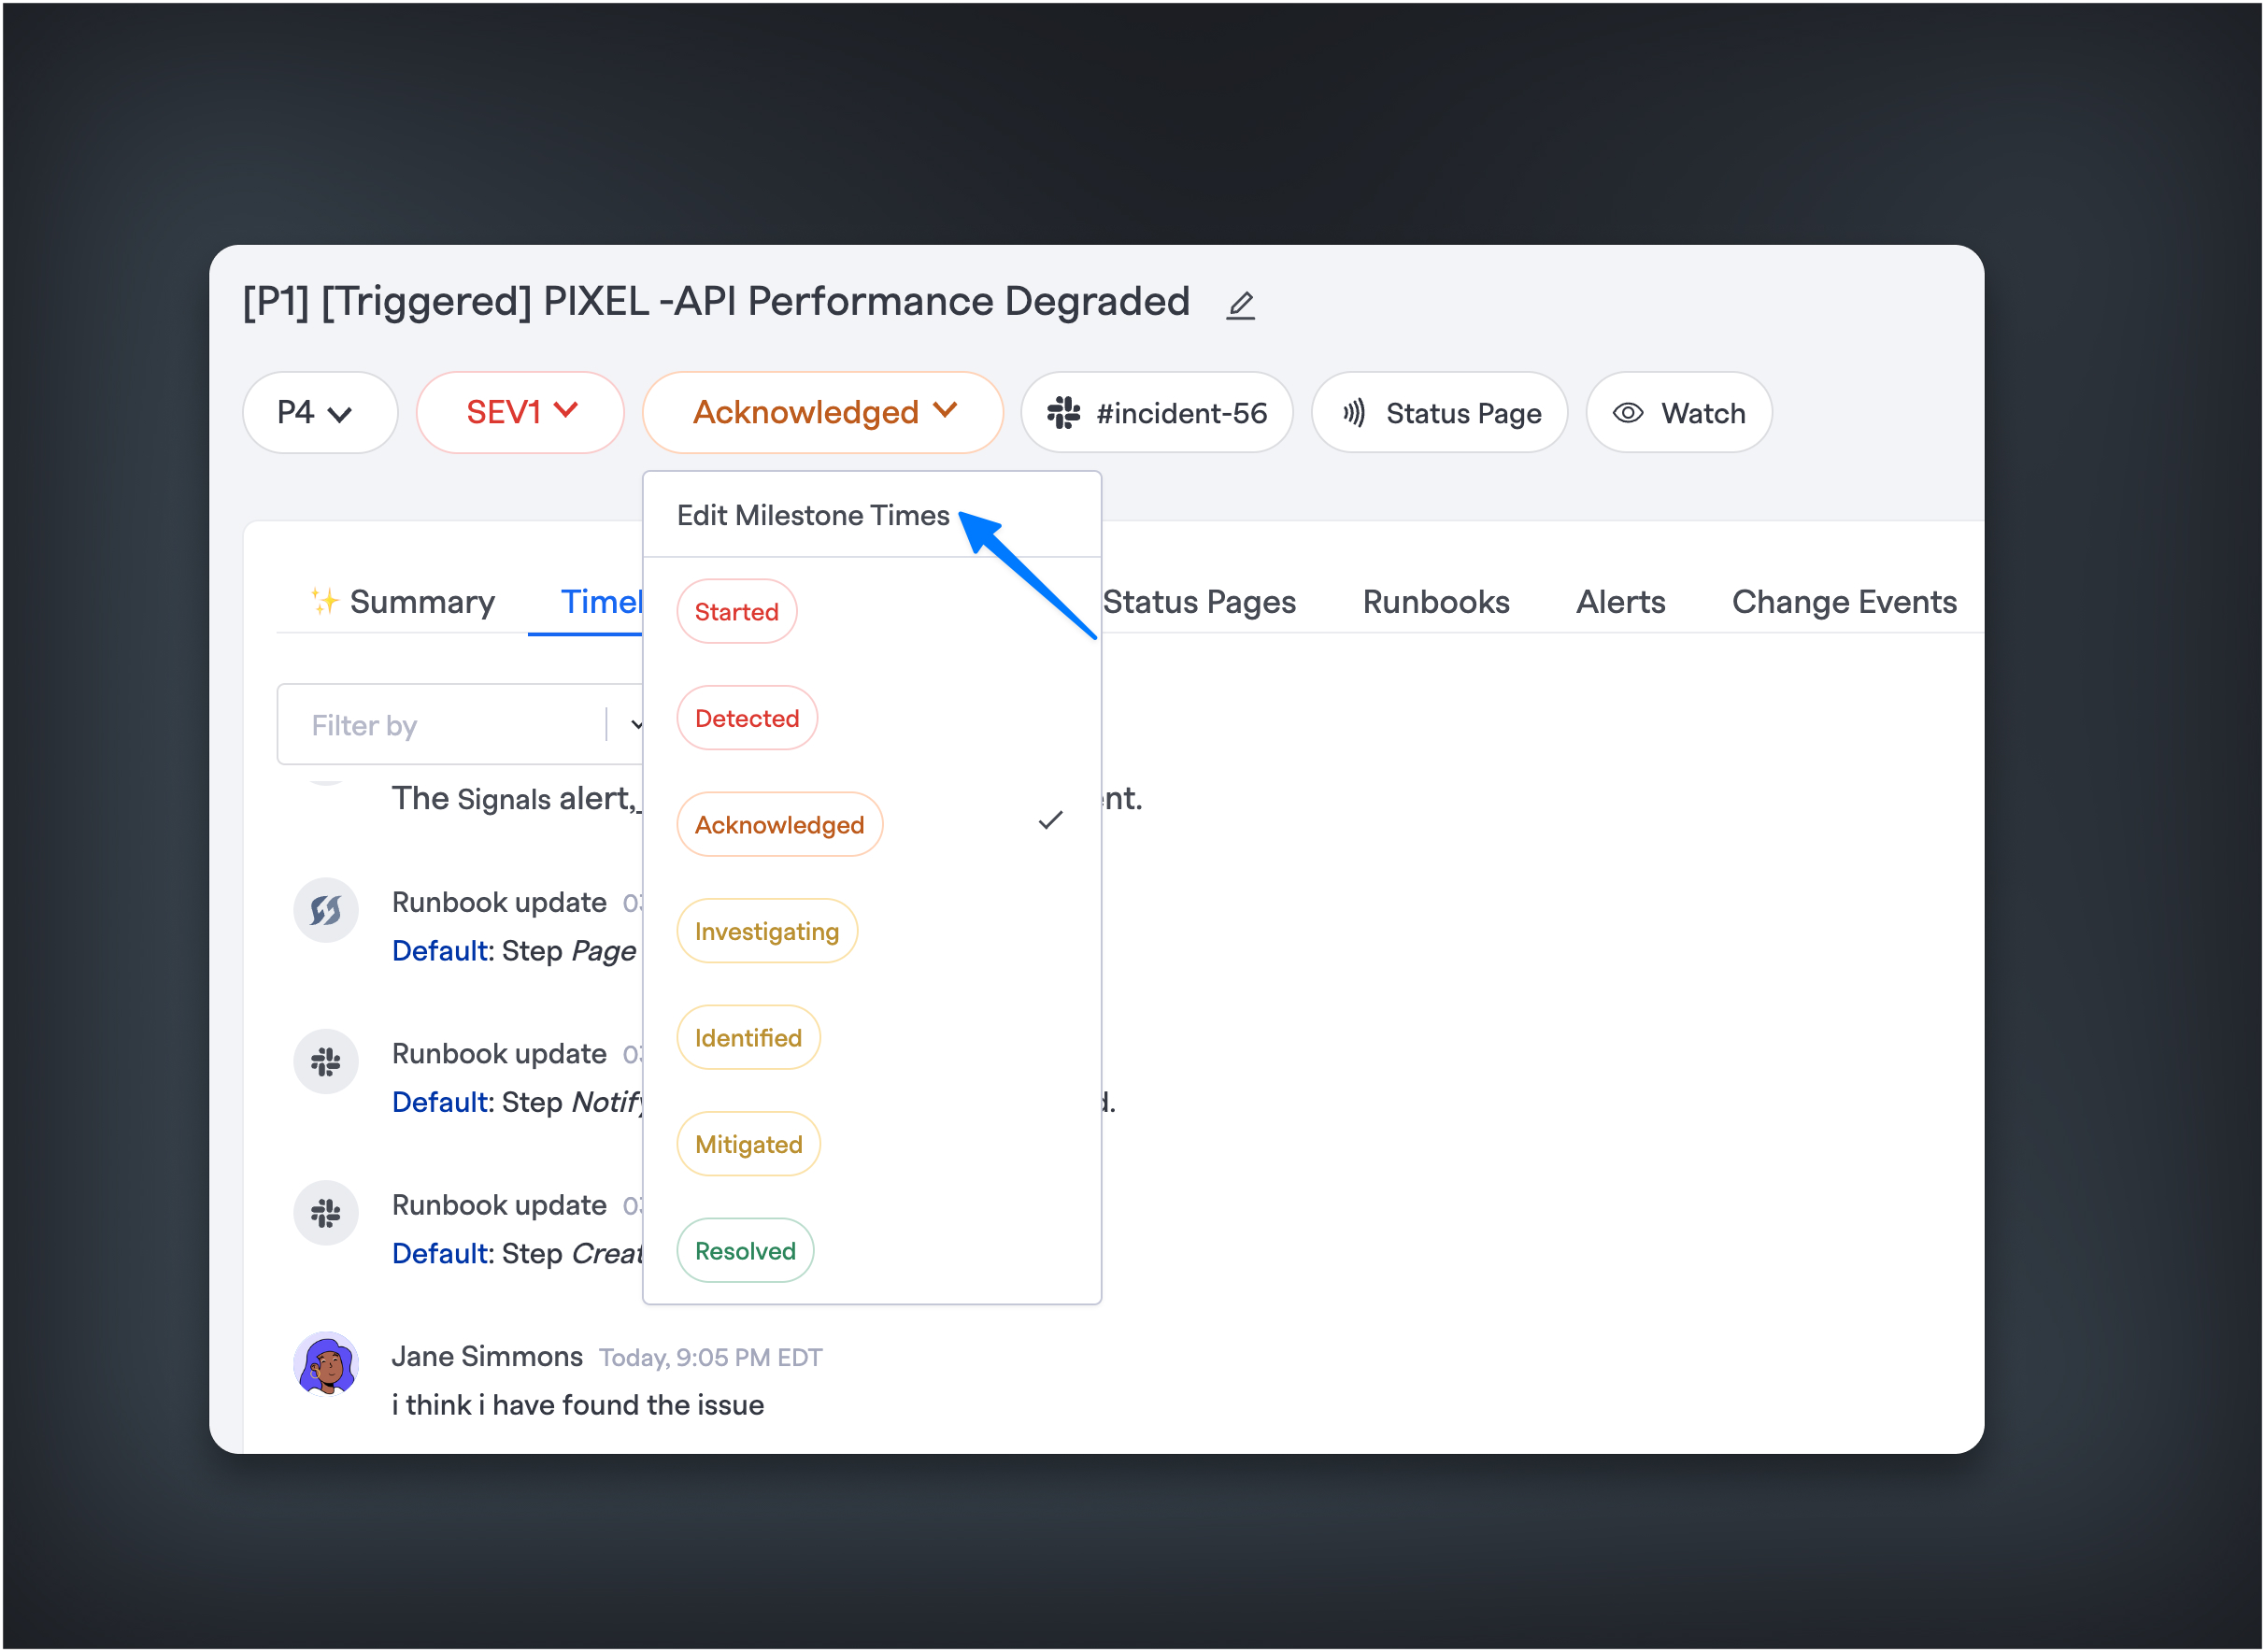
Editing the milestone timestamps via Milestone dropdown
Alternatively, you can go to any event in the timeline, click the ellipses, and then use that particular event's timestamp as a value for a chosen milestone. For example:
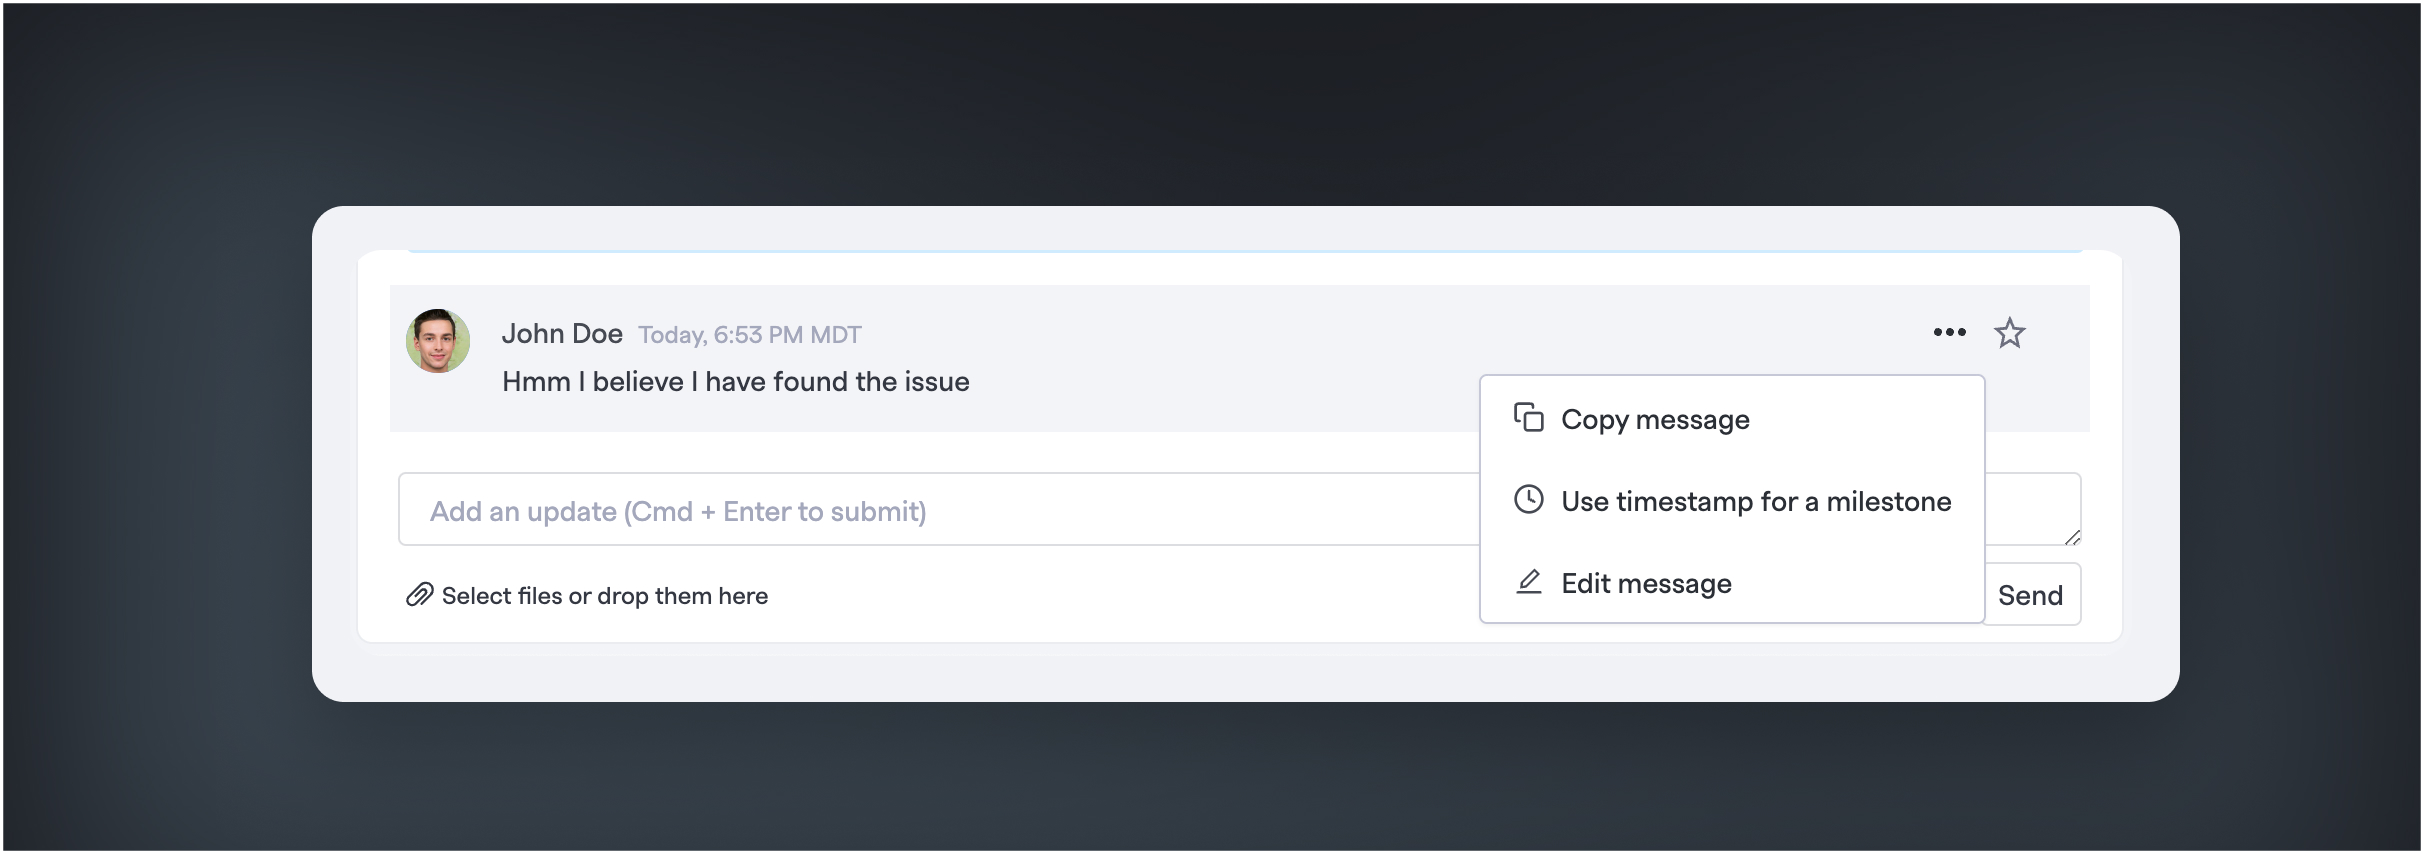
"Use timestamp for a milestone" will take the timestamp of this timeline item and set it the milestone you choose.
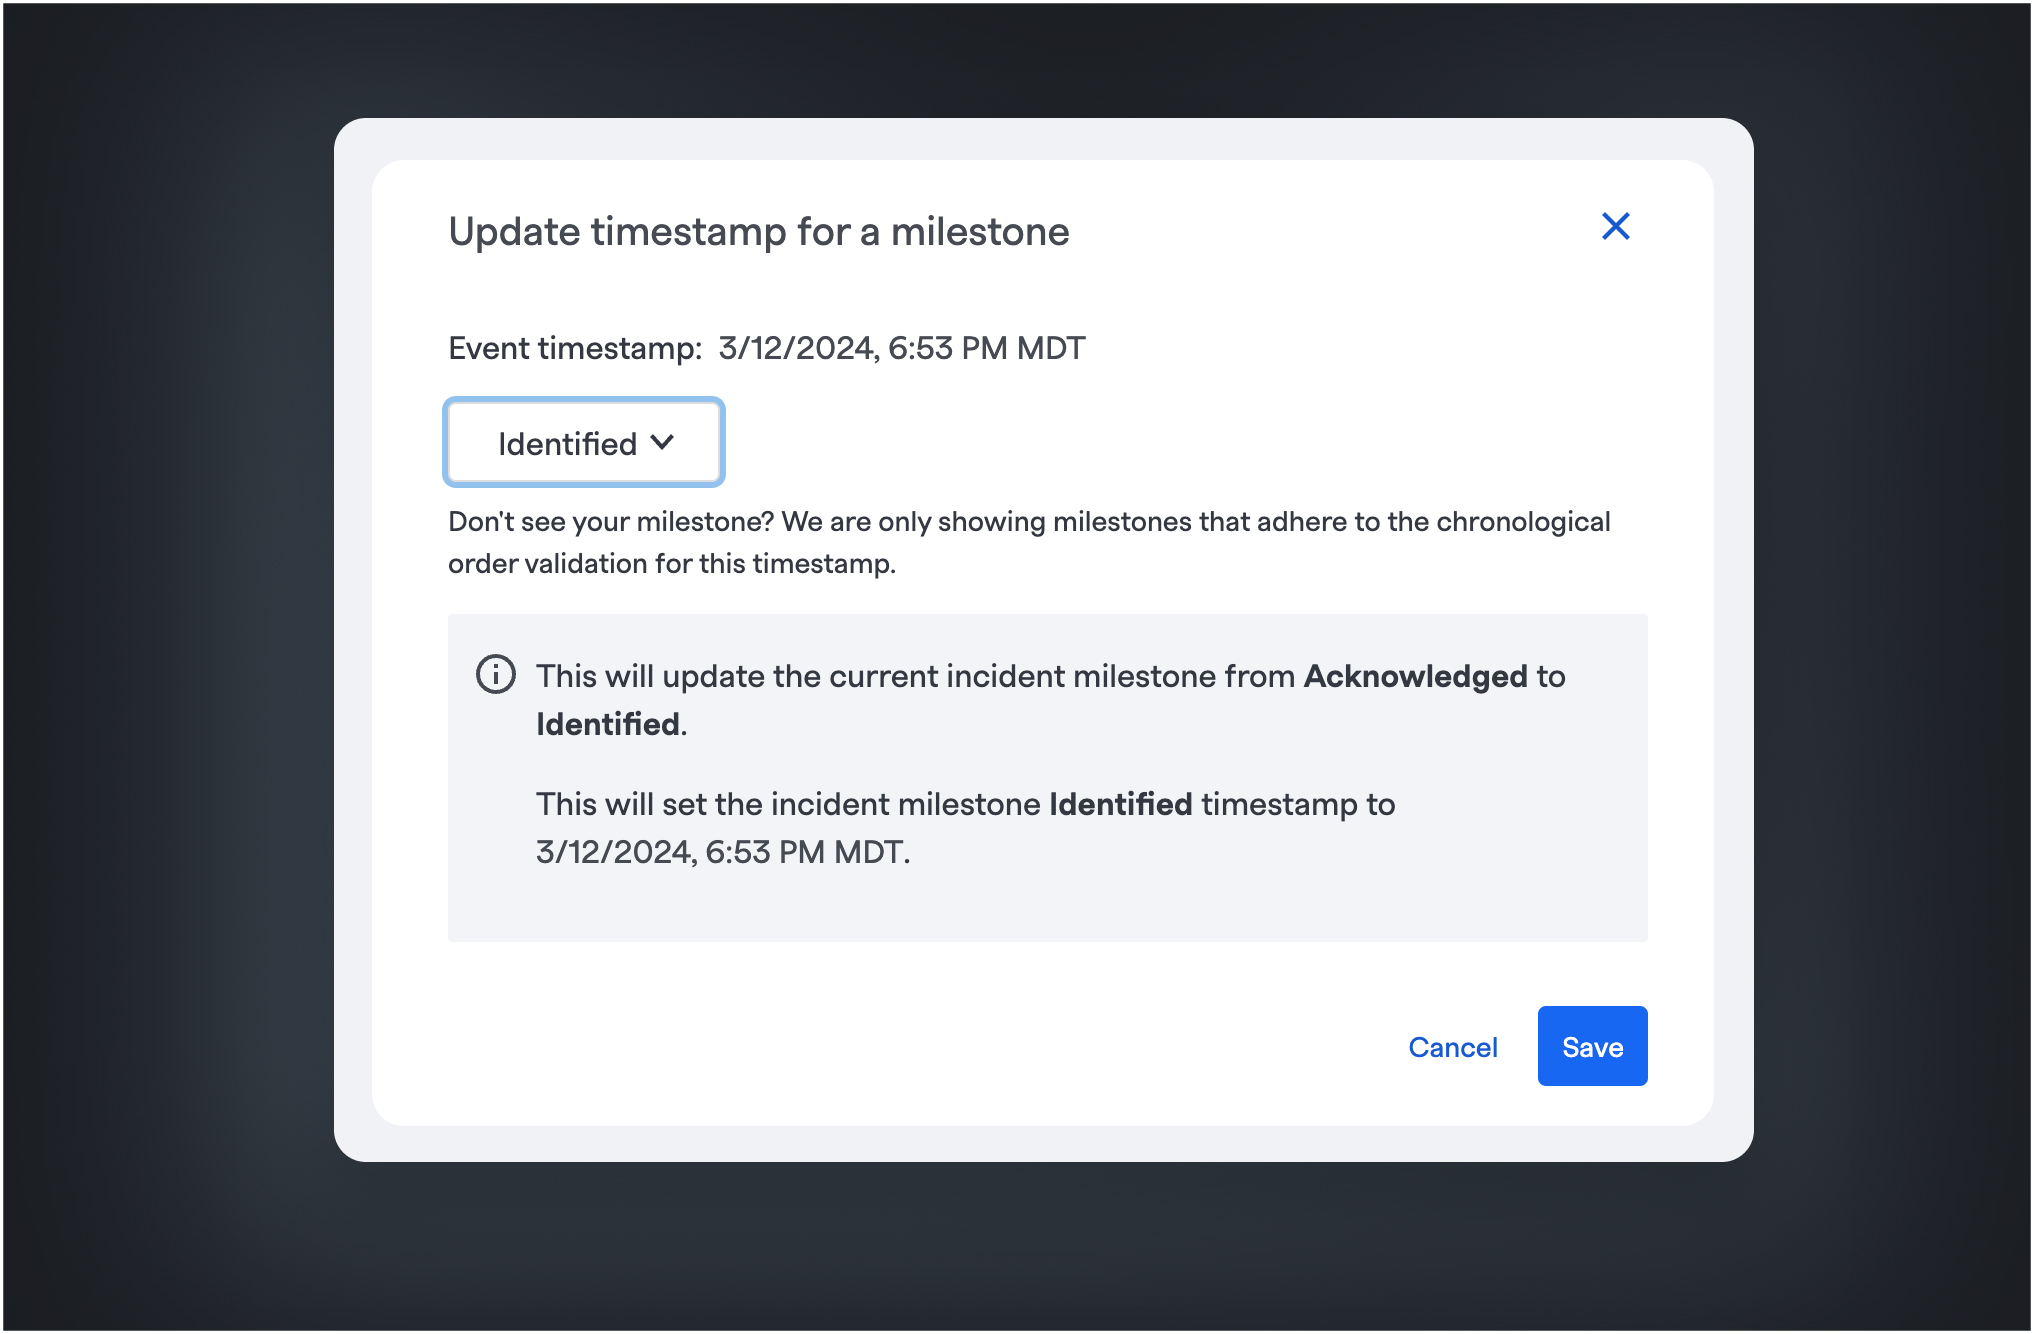
In this example, we set the "Identified" milestone to the timestamp that John Doe mentioned he found the issue.
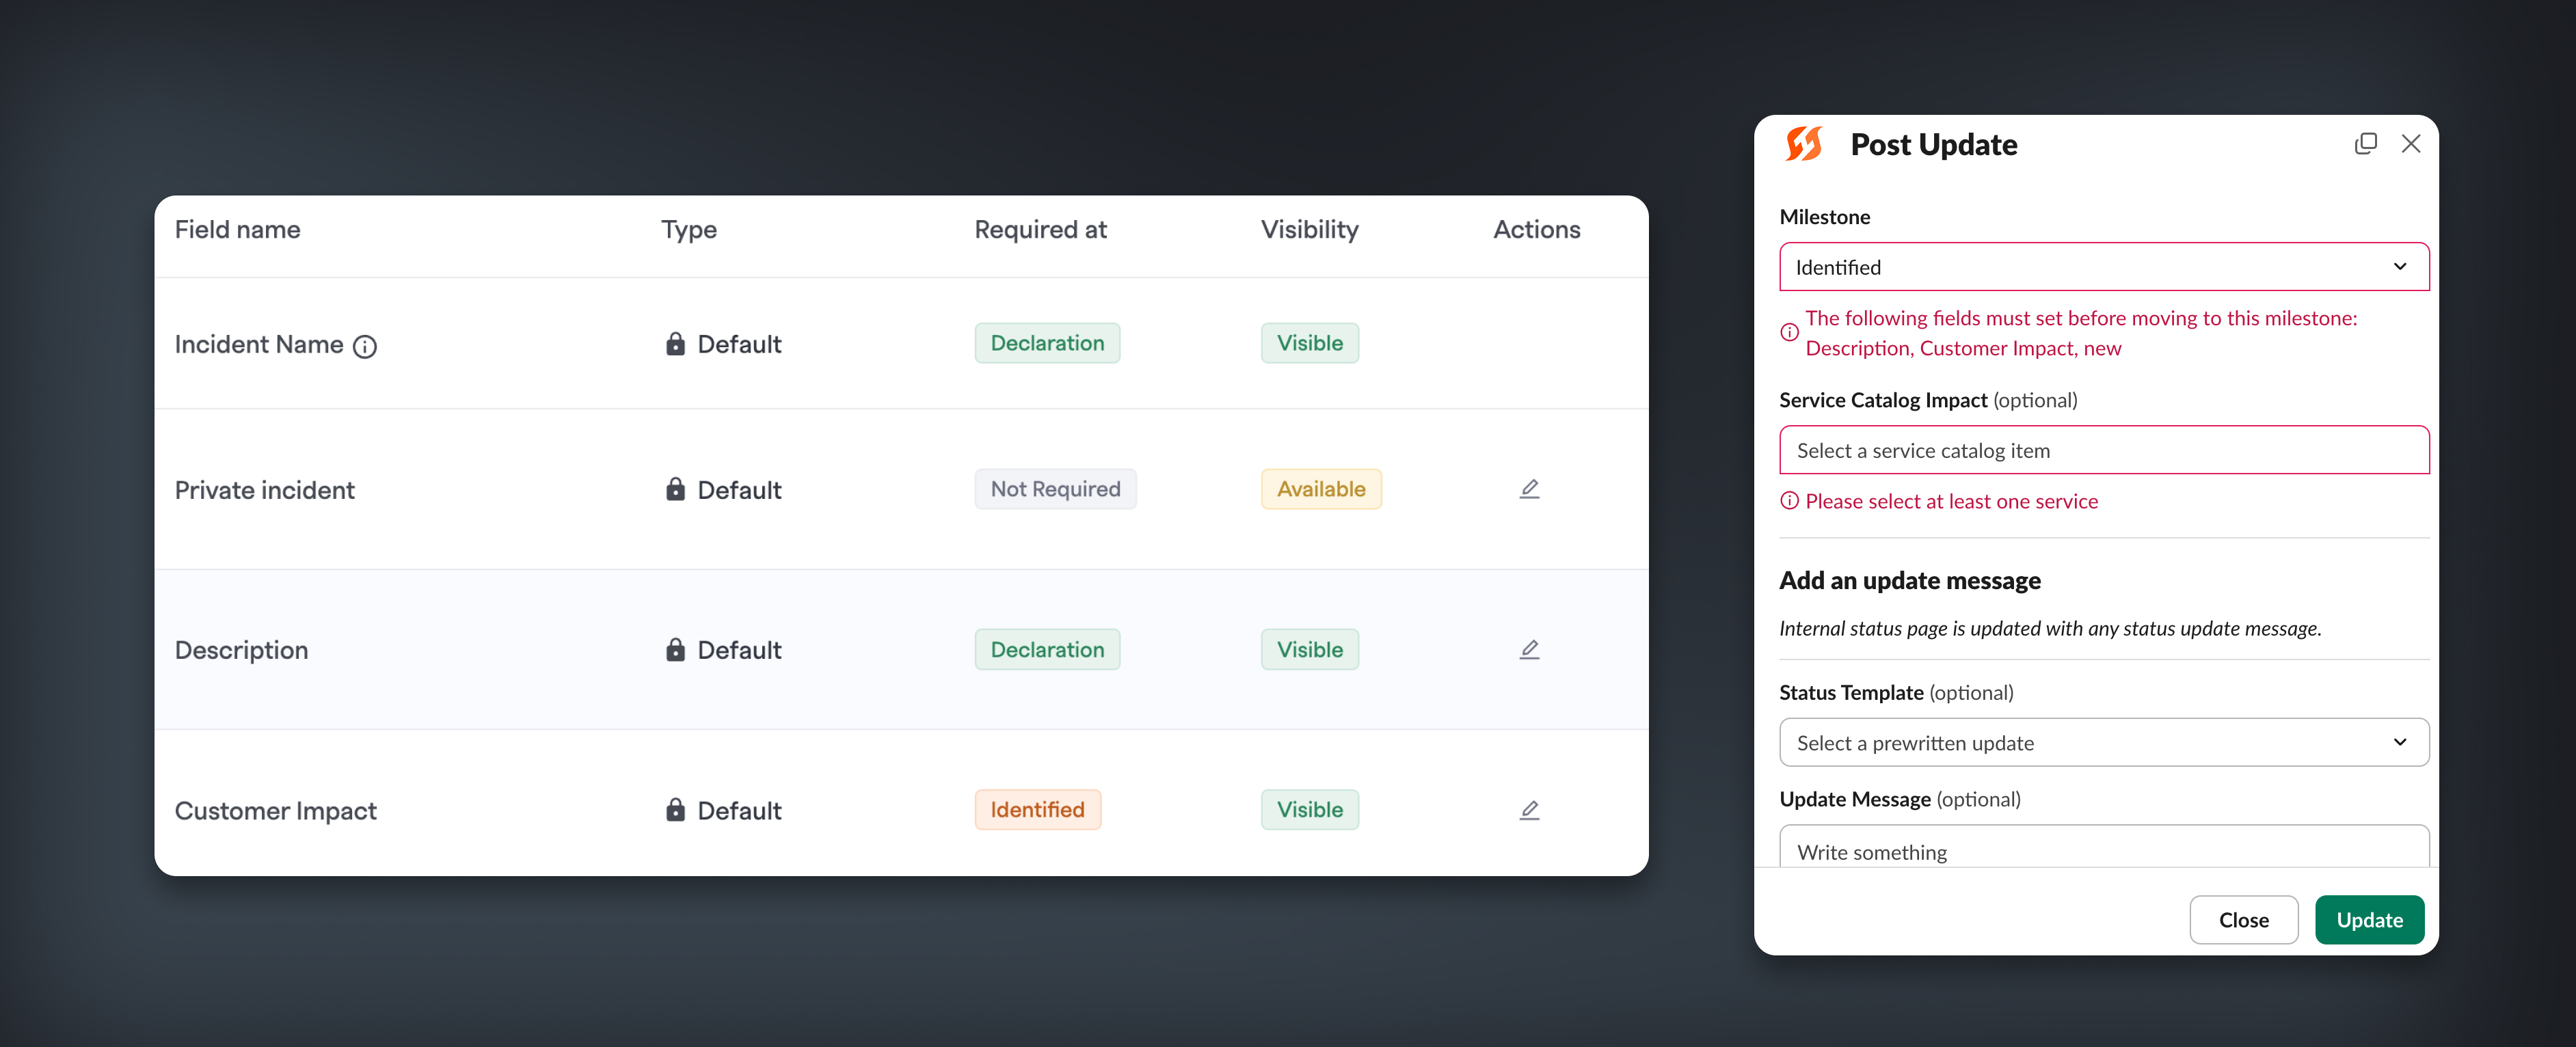
Milestone Required Fields
Organizations can enforce mandatory data entry at specific milestones throughout the incident lifecycle. This ensures that critical information is captured consistently, facilitating more effective incident analysis, reporting, and regulatory compliance.
To modify these settings, go to Settings> Incident Settings and click the Pencil icon next to the field you want to edit. Check or uncheck "Required at and after milestone," then select the milestone where the field should be required. The field will be required at the chosen milestone and any subsequent milestones.
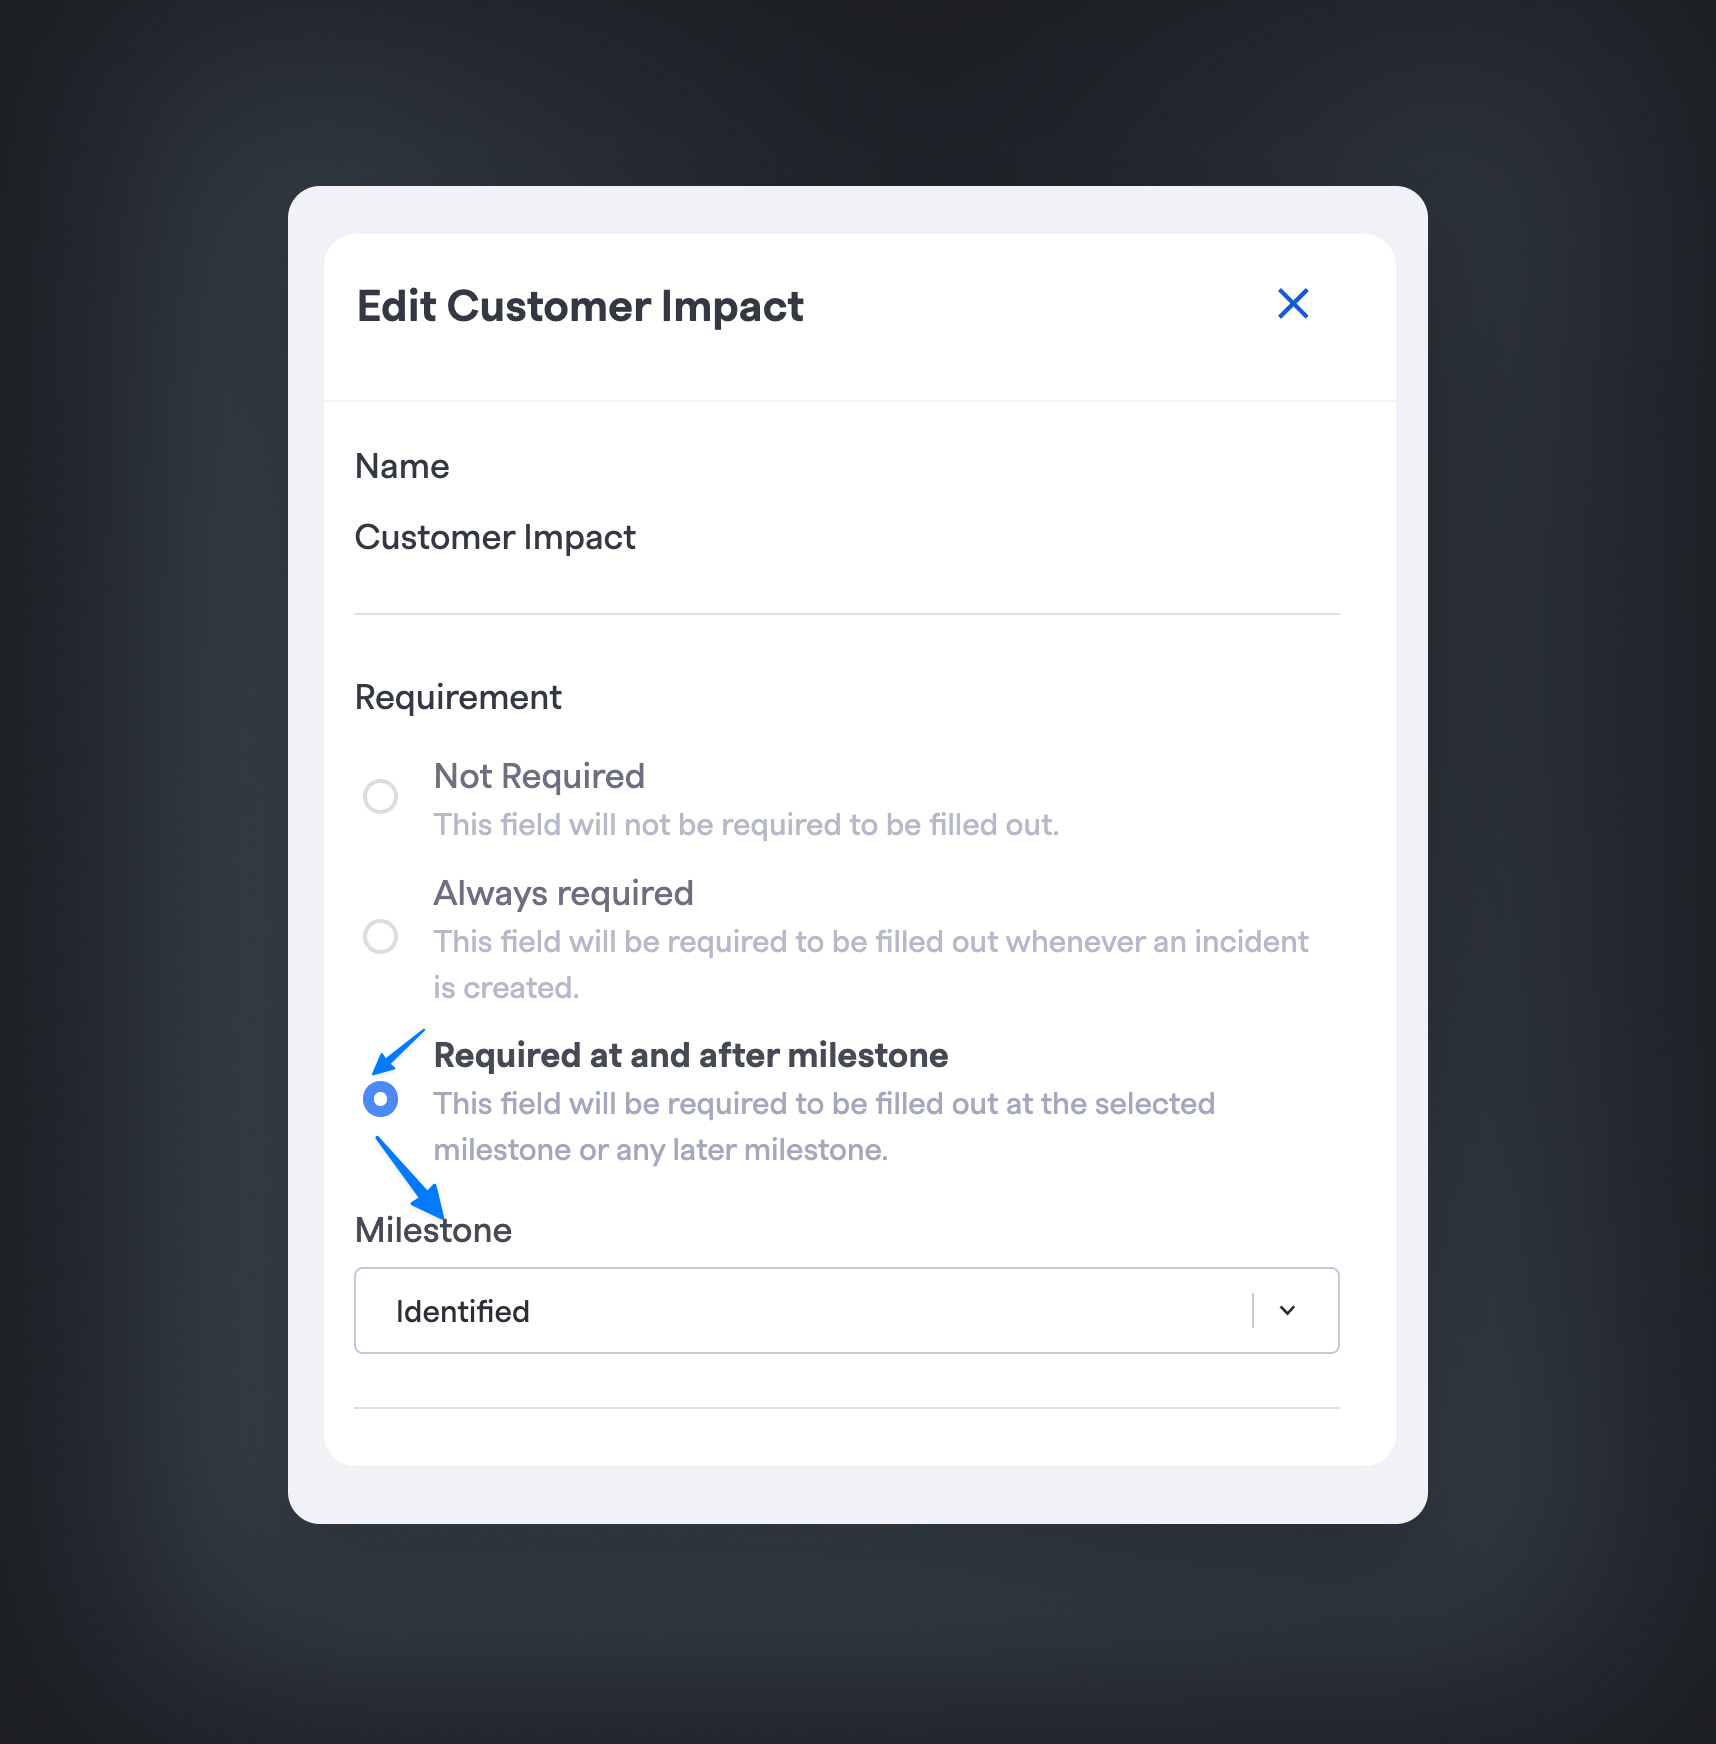
Attempting to transition a milestone with any required fields empty will result in an error via all methods: web UI, Slack, MS Teams, and API.
Default Incident Metrics
Incident metrics are crucial for helping you understand the health and effectiveness of your services, environments, functionalities, and incident response teams.
FireHydrant offers the following metrics based on the default Milestones:
- MTTD: Mean Time to Detection
time of detection - time of incident start - MTTA: Mean Time to Acknowledged
time to acknowledgment - time of incident start - MTTM: Mean Time to Mitigation
time to mitigation - time of incident start - MTTR: Mean Time to Resolution
time to resolution - time of incident start - Healthiness:
(MTTM * incidents) / time window- We use time to Mitigation by default, as the Mitigated milestone generally indicates the time customers no longer see impact on an incident.
- Impact: Within a given date range, multiple incidents are added up to calculate the time a service, functionality, or environment was degraded.
To learn more about customizing these metrics, visit Custom Milestones.
Next Steps
With a basic understanding of FireHydrant's incidents, dive into the details of conducting one by visiting the following pages:
Updated 5 months ago
